

Using Corian® or solid surface window sill treatment is a great way to create beautiful, long lasting, water-damage proof, windowsills for your windows. It’s time to let go of your fears of what will happen to your windowsill surface if you accidentally over water your plants, forget to close the window during a rainstorm, or if condensation builds up on the inside of your window and drips on the sill. Breathe easy—these mishaps have no effect on non-porous, solid surface windowsills!
Solid surface material has many attributes that contribute to making a windowsill a labor of love and ease. Here are six…
- No grain and is Non-porous.
- Cuts and sands like hard wood.
- Virtually “seamless” after gluing pieces together.
- Sunlight and UV resistant.
- No coating to peel or fade.
- Won’t rot, mold or mildew.
The Evidence Speaks for Itself


As you will see, solid surface windowsills speak for themselves. Pictures 1 and 2 below show a Corian® Glacier White window sill that has been in place 17 years and has always had plants sitting on it. This sill has withstood water rings and if a metal pot left a rust ring on the sill, Comet and a Scotch Brite pad removed it with a few scrubbing motions. Otherwise, maintenance consisted of simply wiping it clean with a damp cloth.
In the first picture you can see the three main components that make up the sill: 1) The overhang that extends down at the front of the sill; 2) the ends (ears or wings) of the sill that extend beyond the edge of the window casing; and 3) the flat surface between the overhang and the window that is commonly referred to as the deck.
Create Your Own Corian® or Solid Surface Windowsill

 To create this sill, glue together three strips of solid surface material to create the overhang and ear (or wing) portion of the sill. (Figure 1.)
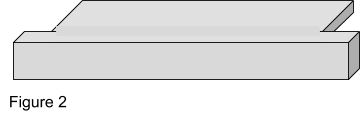
Next, glue the three-strip portion to the front edge of the deck piece that sits in the sill area. (Figure 2.) Notice, that even though there are three seams present, there is no evidence of their existence after the excess glue squeeze-out is sanded away. Building the overhang in this fashion is advantageous because it can be sized so the wings and overhang are exactly what you want, without having to trim them to size after they are glued to the deck piece.
It’s a lot easier to create and finish some aspects of the overhang prior to gluing it to the deck piece. For example, trimming the wings to fit around the window casing is not necessary if the pieces that make up the overhang are sized correctly before attaching them to the deck. On the other hand, routing a profile on the overhang is easier if it’s crafted after the overhang is attached to the deck. Remember to leave ⅛” on either end of the deck to allow for expansion.
Once the windowsill is completed and dry fitted to the windowsill area, it’s ready to be attached. The sill must be supported by an adequate substructure of either wood or masonry materials. Depending on what it’s being attached to, you may want to include an insulation layer like a thickness of wood or other insulating sheet under the deck of the sill. Attach the deck of the sill to the substructure with several daubs of 100% silicone sealer. Apply a 100% silicone bead of caulk around the perimeter of the deck and overhang to stop water seepage and let it set overnight. Now you can enjoy your new trouble free windowsill for years to come!


One Response
How exactly is the vinyl replacement window removed? If your Cory and Cel and extension jams are fixed not making sense to me unless you have an additional window stop of some sort kindly acknowledge receipt of this question.