Monthly Archives: September 2013

5 Things You Never Knew You Could Do With Corian® or Solid Surface

Bend It, Curve It, Twist It, Round It, Shape It…

Need a curved backsplash or solid surface countertop, a rounded shower stall, or a tub with a recessed soap dish or shampoo holder? Have you come against a situation where you need to bend solid surface materials around an odd corner or curved wall? Or perhaps you want to set your creative juices to work on a flowing design that includes free-form waves or columns? …No problem. Thermoforming is your answer!

What’s Thermoforming?

In the simplest terms, thermoforming is a process of heat-shaping synthetic material. And one of the greatest advantages of many solid surface materials is their ability to be heat-shaped in relatively few steps.

Innovative solid surface materials like Corian®,  LG HI-MACS®, Samsung Staron®, Wilsonart™ Solid Surface, Formica™ Solid Surface, Hanwha Hanex®, Avonite®, Meganite, and Mystera (to name a few) now offer the greatest flexibility (excuse the pun!) to make your creative vision come to life. What was once a complicated and time-consuming process through the carving, chiseling, or steaming and bending of materials like stone, granite or wood, is now made easier. Flexible when heated, these solid surface materials can be thermoformed into many shapes. With the proper heating elements and molds—dictated by the size and outcome of the project you are attempting—you can now bend, curve, twist, round-out and shape many solid surface materials into the desired contour within minutes.

People Prefer Curved Contours…

Incorporating curved features into your designs can even result in a boost in the desirability of your product.  As it turns out, flowing curves are just as aesthetically pleasing and desirable in man made designs as they are in our natural environment… and science has proven it. In a study conducted at Harvard Medical School1, it was discovered that people gave visual preference to items with curved contours over sharp-angled contours.

What does this mean for you? Introducing curved contours into your work and surrounding environment can directly influence the preferences, first impressions, or overall comfort of anyone who sets eyes upon it!

Ready to start bending, curving, twisting, rounding, or shaping?

Check out the details of how to get it done and read more about the technical application of thermoforming in our “Working With Solid Surface Guide – How to Thermoform Solid Surface”.   Pay particular attention to the one-of-kind thermoforming table contained within—the only resource of its kind where you can find comprehensive specifications for nearly every kind of solid surface material that exists at this time.

We look forward to hearing about your curved creations and experiences in the comment section below.

References

1 Bar, M., & Neta, M. (2006). Humans prefer curved visual objects. Psychological Science, 17(8), 645-648.

4 Tips to Sanding Corian®: Guidelines for a Perfect Finish

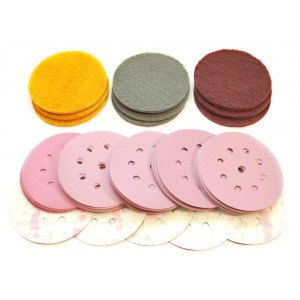
5" Sanding Kit at SolidSurface.com

5″ Sanding Kit by SolidSurface.com

Sanding is often considered one of the most dreaded parts of most DIY or professional projects. However, perhaps a little shift in perspective is called for here. Instead, imagine this… immediately being able to take something from a lifeless finish to a matte or gloss finish, creating a thing of beauty right before your eyes, in a matter of steps!

The Correct Finish for Corian®* is the One You or Your Client or Customer Prefer

Although you should always go with the finish that either you or your client or customer desires, here are some good rules of thumb to choosing an effective finish:  High use areas call for light colors and a matte finish, as this combination is the least likely to show wear and tear. On the contrary, dark colors with a high gloss finish show wear and tear more readily and are best placed in lower use areas. Whatever finish is chosen, no additional sealers or coatings of any kind are required.

Use Random Orbit Sanding

Using a random orbit sander can provide you with an almost undetectable “scratch pattern.” The random orbit-sanding pad oscillates in a 3/32” circle while rotating at a variable rate, in a circle the width of the sander. The resulting sanding pattern is described as being a “random orbit scratch pattern” that is very difficult to detect compared to scratches left when sanding in a straight line or a circle.

To achieve an even sanding pattern over a large area, move the sander itself, front-to-back, over an area of about 2’ x 2’ and then cover the same area side to side. Repeat this pattern over the area two or three times. Wipe the area thoroughly with water to remove the sanding grit and dust and repeat the process with the next finer grit. Each new pass of the sander (front to back or side-to-side) should overlap the previous pass by 1/3 the diameter of the sanded path.

TIP: we recommend using a 5” or 6” diameter random orbit sander with a hook and loop disc and the ability to collect its dust.

Corian® is the Same Color Throughout, So—Sand Away

Many of the color options for Corian®, as well as other brands of solid surface, arrive from the factory with a matte finish, so sanding with a 280-grit disc will produce a similar matte finish. Before you change to the next finer grit make sure that the sanding scratches from the previous grit are completely removed and you’ll have less work to do. See the section below for how to achieve higher gloss levels.

If necessary, deep cuts or scratches can be removed using 120-grit, followed by 180-grit. When you are sanding out a deep scratch or cut, be aware that you may leave a noticeable indentation if you only sand the immediate area of the cut. Instead, feather sand the area away from the cut. Start by using 120-grit paper to sand away the cut in a tight circular pattern and then increase the sanding radius out to about 12”, spending more time toward the center. Next, sand the entire area with 180-grit paper, feathering out another 8” or more. Remember the color goes all the way through.

TIP: the larger the sanding grit number, the smaller the grit. The reverse is true if you are talking about grit size in microns. Also, positioning a light beyond the area you are sanding will help you see the sanding pattern.

Level of Gloss

In a situation where the countertop surface is completely covered by sanding scratches, the less depth that the scratches have, the higher level of gloss. Or stated differently, if light rays bounce off a surface without being deflected by sanding scratches, then you would see a mirror like reflection. As scratches on the surface become deeper, the light is deflected at greater angles. The resulting images become less distinct and less polished or mirror-like. Ultimately this results in a semi-gloss or blurred image, to even a matte finish where no image is reflected.  For a more in-depth article on finishes, see How to Clean and Refinish Corian® and Other Brands of Solid Surface Countertops.

Using non-woven pads (available in our sanding kits) with a random orbit sander adds an interesting touch to the desired finish that is hard to describe. Sand the surface one final time with 280-grit paper if a matte finish is desired. Making another pass with a maroon colored 320-grit non-woven pad, will give the surface an additional touch of “richness” that is different than if you had used a sanding disc with 320-grit.

The Sanding Sequence

Use 120-grit and 180-grit discs to remove heavy scratches and return the surface a flat finish, similar to the flat finish provided by some sheet manufacturers.

    • Matte finish: Use 280-grit and then the maroon non-woven pad.

    • Satin finish: Use 280-grit, 400-grit, and gray non-woven pad

    • Gloss finish: The degree of gloss appearance desired will depend in part on the material color and particulate composition. Use 280-grit, 400-grit, 600-grit and the gold non-woven pad for a moderate gloss. Then for a higher gloss use the 1000-grit in place of the gold pad and the 2000-grit polishing compound with the white non-abrasive non-woven pad. For the gloss-purest you can buff the surface with an automotive polisher and foam polishing pad glaze. This will yield the ultimate shine!

  • Surface Maintenance: Surface maintenance procedures are dependent on the type of damage and the degree of shine on the finish. Sand out cuts and scratches with 120-grit, 180-grit, and then 280-grit, which will approximate the matte finish of the original piece. Then use the procedures above to match the final finish.

Tip: if a small surface area with a matte finish needs touch-up, experiment with a damp sponge and cleansing powder like Comet®. If there is more sheen than a matte finish then use a cleansing powder and a maroon, grey, or gold non-woven pad.

Grit to Micron Conversion: 120-grit (125 micron), 180-grit (82 micron), 280-grit (52 micron), 400-grit (35 micron), 600-grit (26 micron), 1000-grit (18 micron).

*Corian® (by DuPont™) was invented in 1964 and has become the term used by many to refer to solid surface materials. Since then, several brands have been developed that are all similar in how they look, wear, and are fabricated. Other manufacturers and brands include:  LG Hausys HI-MACS®, LOTTE Staron®, Wilsonart® Solid Surface, Formica® Solid Surface, Hyundai L&C Hanex, Aristech® Avonite Surfaces®, Aristech® STUDIO Collection, Meganite®, and Mystera®, to name a few.

Information in this communication is provided as possible ways among many to accomplish the goals expressed and there are no warranties implied. SurfaceNet LLC dba SolidSurface.com is not liable or responsible for any actions taken.