
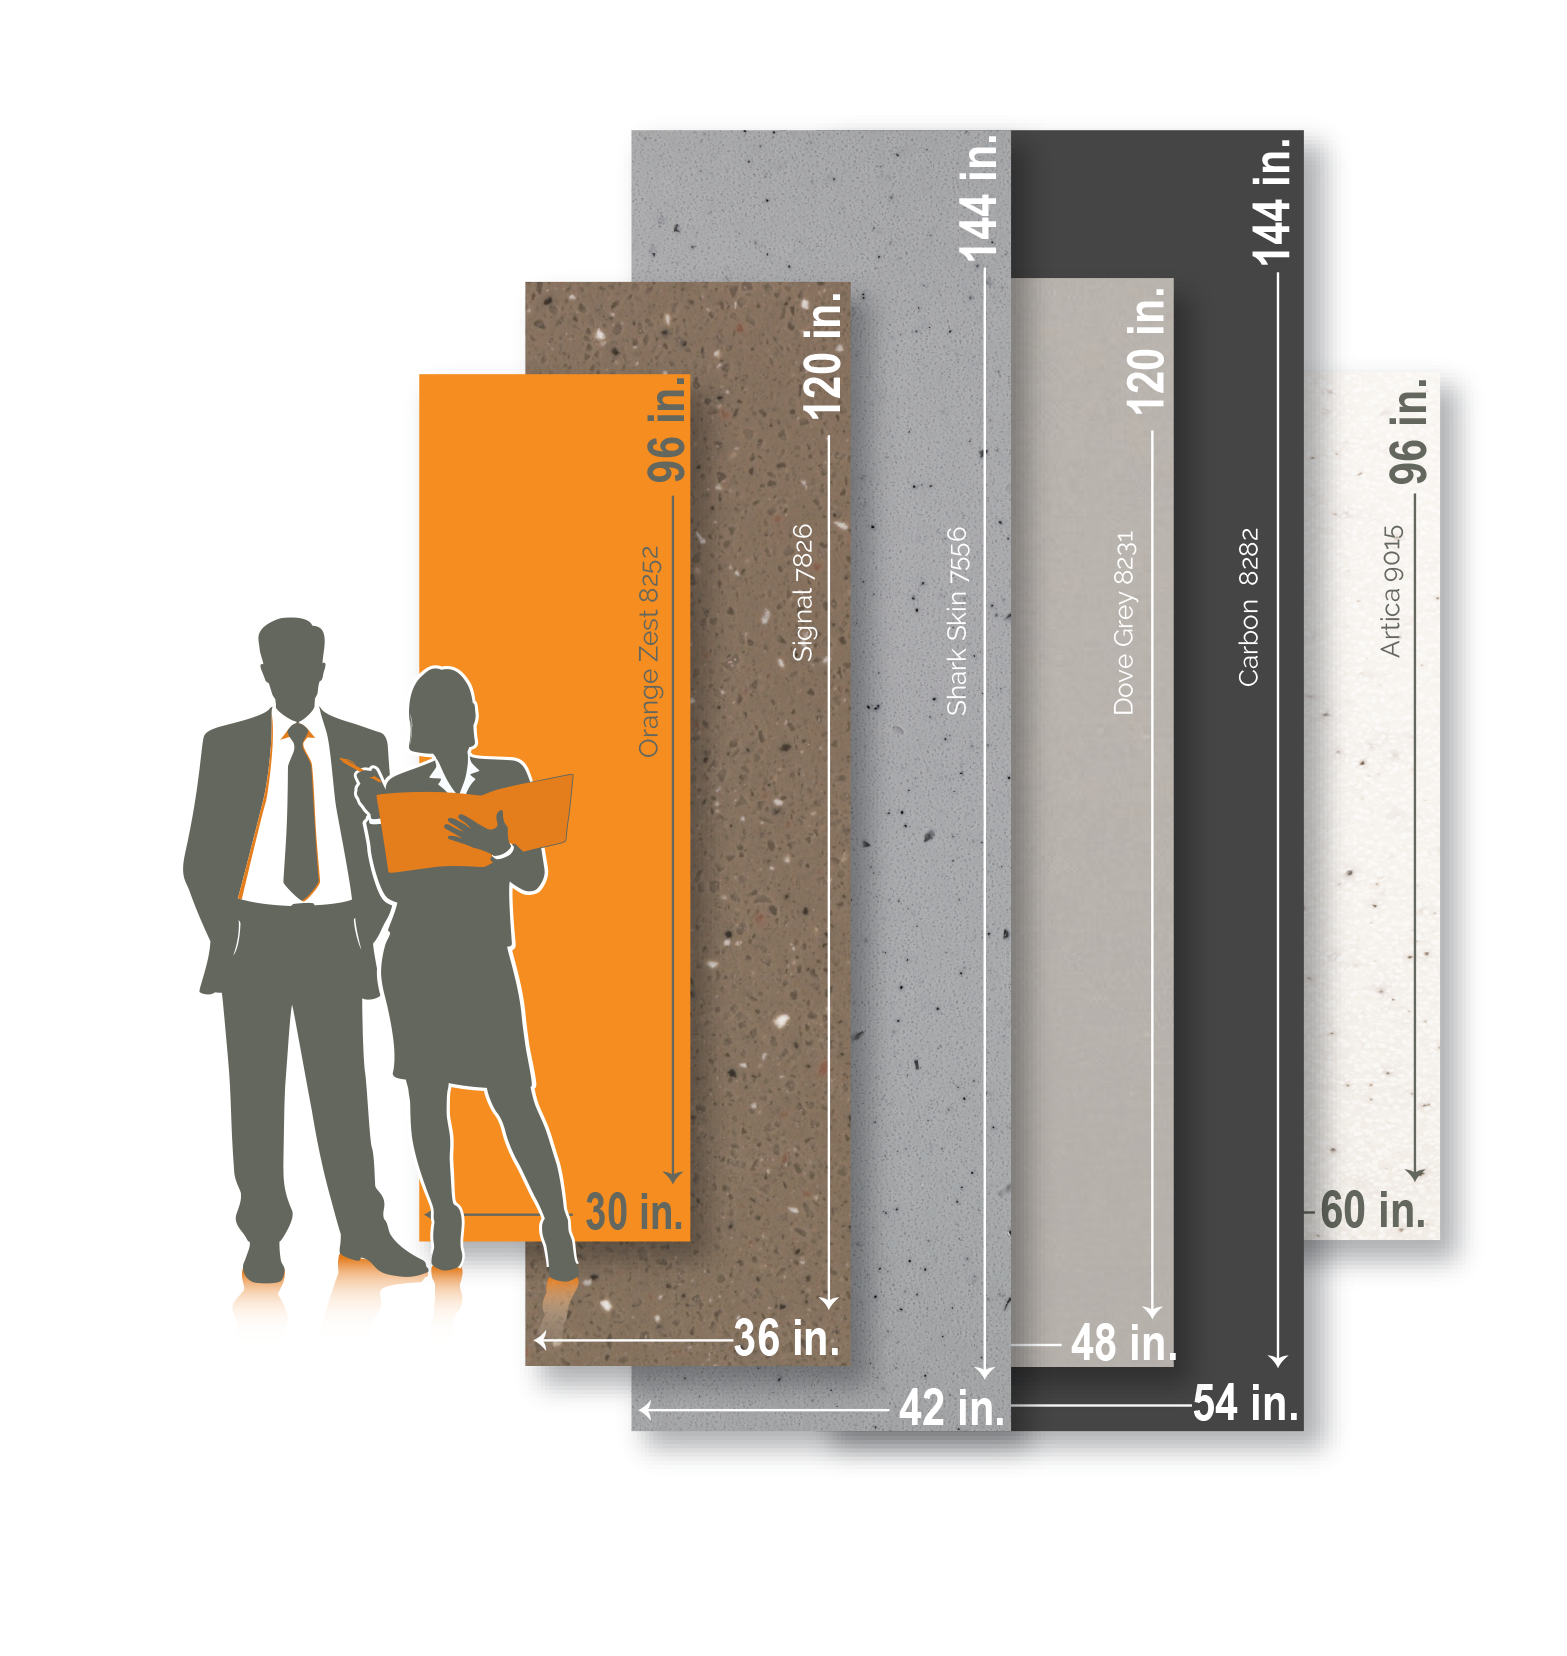
Aristech®’s Avonite Surfaces® Flexible Sheet Sizes
It is now easier than ever to install solid surface wall and shower panels using Avonite Surfaces® up-to-60” wide sheets. The extra wide solid surface wall and shower panels also save on material costs. For the DIY’er, that’s huge!
Available Colors
There are many reasons to use Avonite Surfaces®, or another brand of solid surface material, for your bathroom tub surrounds and shower walls. Not only are the colors and patterns aesthetically pleasing, ease of cleaning, antiseptic properties, and durability are among the top advantages. Shown below are the Avonite Surfaces® colors that are available in the extra wide solid surface wall and shower panels:
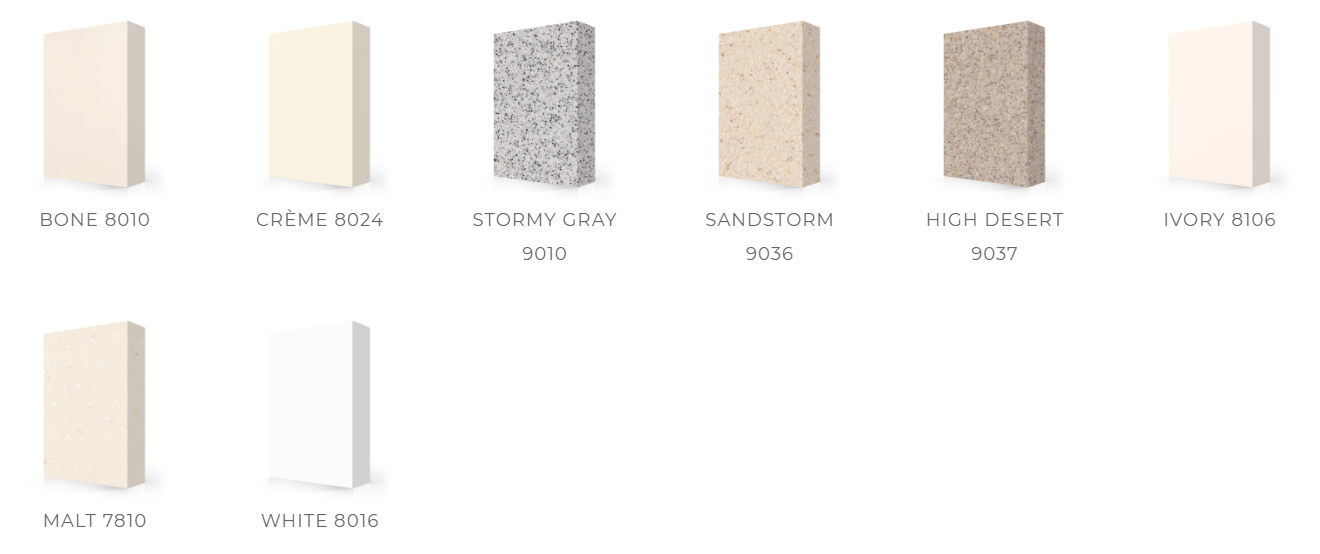
Extra wide solid surface wall and shower panels available in these eight colors
Once you’ve decided to surround yourself with Avonite Surfaces® solid surface for your shower or bath project, it’s time to get down to the nuts and bolts of installing the extra wide solid surface wall and shower panels.
Installing Shower and Bathtub Walls (Surrounds)
Let’s start out determining how many sheets of material you will need. For bathtub surrounds, the long wall will need only one sheet of the extra wide width, instead of two of the traditional 30” wide sheets. Choose from 30”, 36”, 48”, 54”, or 60” wide by 96” or 144” long from the Avonite Surfaces® line of acrylic solid surface products. These extra wide solid surface wall and shower panels are available in both ¼” and ½” thicknesses. Typically ¼” is more common for shower installations. No more than one sheet will likely be needed for the end walls as well.
There are major advantages to having the extra wide sheets for tub surrounds and shower walls:
- No more hard seaming together with solid surface adhesive–using 2 sheets is a thing of the past–saving labor and materials;
- No need for a backing plate (strip of solid surface glued to the back of and covering the seam as support);
- No need to create an open channel in the substrate for the backing plate which protrudes from the back side–eliminating extra time and labor;
- Since two 30” wide sheets are no longer used, there is no need for a batten strip to hide a soft seam over the silicone joint.
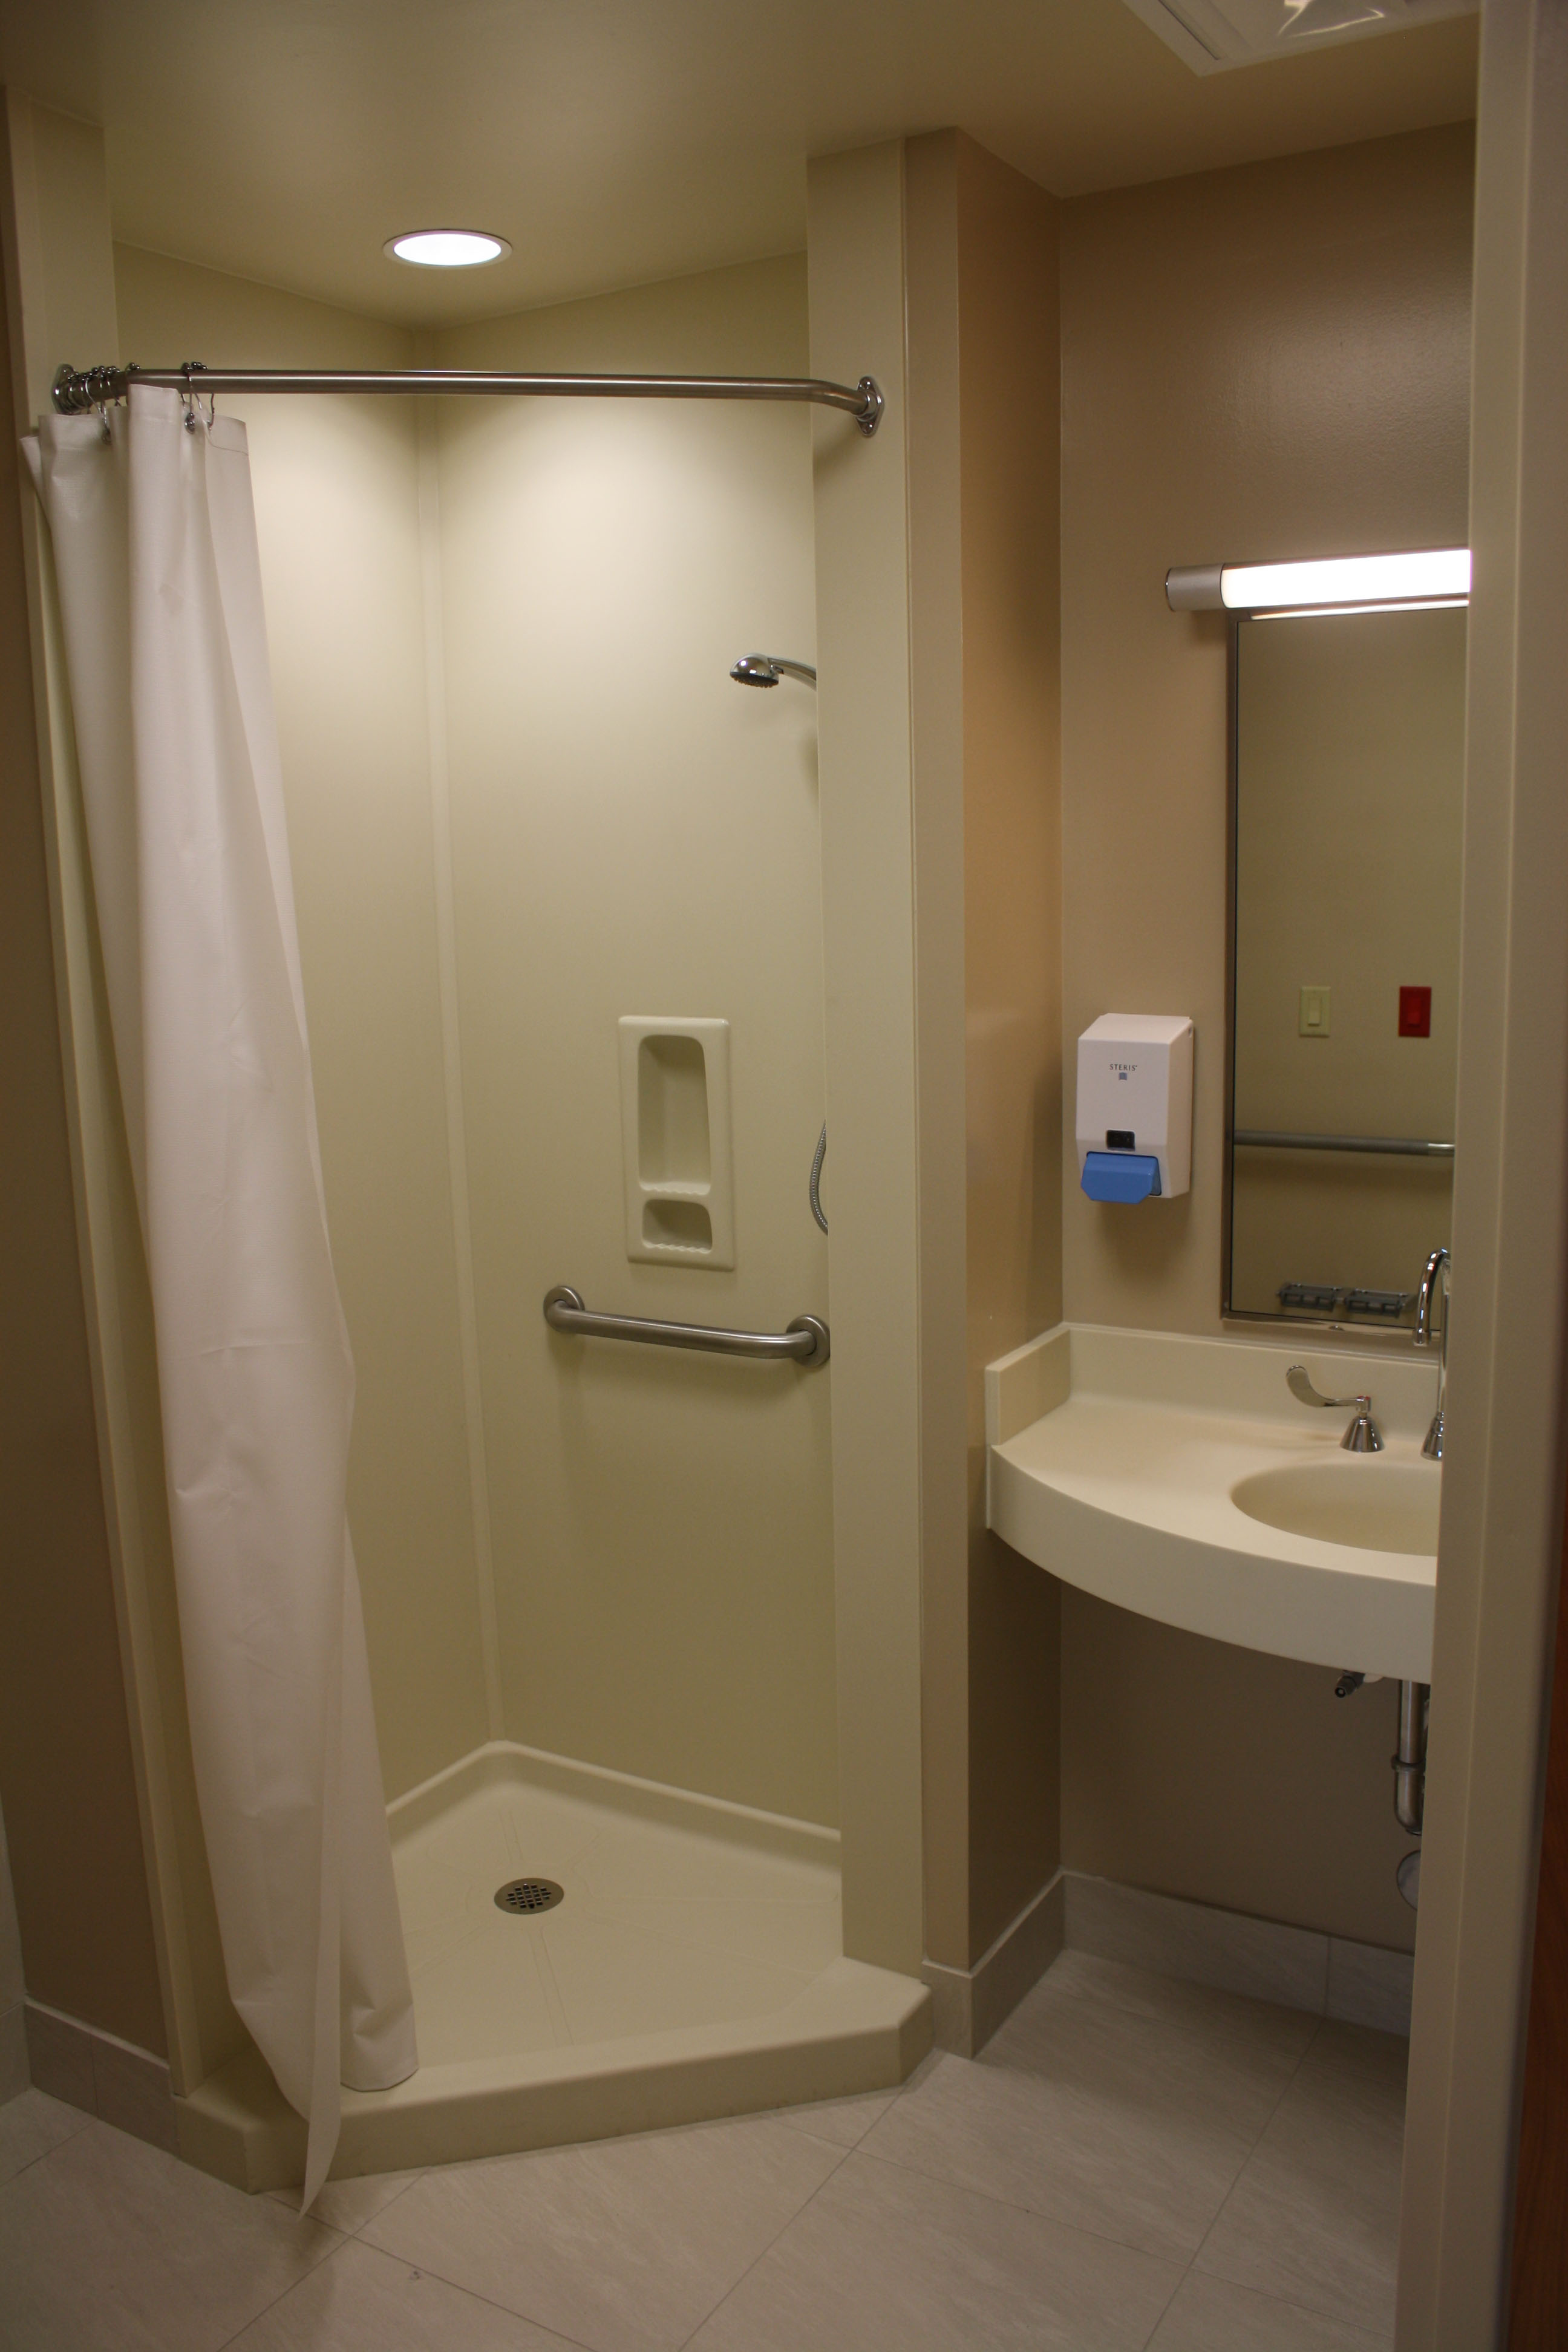
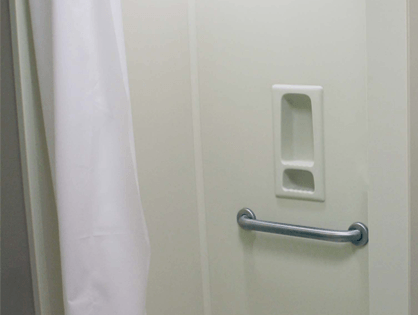
Avonite Surfaces® Bone 8010 shower wet wall panels in a hospital bathroom.
Most showers without a tub (with the exception of very large custom showers) will not require more than one sheet per wall. All of the advantages mentioned above also apply to this type of shower wall installation. Additionally, the Avonite Surfaces® line of shower components includes eight matching color options for shower bases, trim pieces and soap/shower caddies. In the event that you need to join together wall panels for larger showers, instructions for joining sheets can be found here.
Base Installation
The floor of the area to hold the base must be clean and flat so thinset mortar will adhere to the floor. This floor area must be large enough to hold the base. Be sure to first “trial” fit the base into the area. The base should slide in easily with approximately 1/16” to 1/8” gap between the studs and the edges of the base. After the trial fit, remove the base from the area. Using the instructions for the drain, install the drain into the shower base using plumbers putty or silicone.
Next, with a notched trowel, apply the thinset to the floor of the area in sufficient thickness that all supporting points of the base will come in contact with the thinset mortar. Lay the base onto the thinset and check that it is level. Remove any excess thinset from the threshold area. Allow the thinset to harden for 24 hours. Then test with a cup of water so that when poured in various parts of the base, it runs down the drain. Cover the base with cardboard to protect it from the remaining installation.
Site Preparation for Walls
The surface area where the solid surface panels will be attached needs to be sturdy and moisture resistant. For this substrate use drywall or tile backer board. You can use the old tile walls so long as any loose tiles are reattached and the tile surfaces are clean. Do not attach solid surface panels to a masonry wall or any other type of construction that is prone to moisture, seepage or collection.
Eliminate water wicking into the substrate by leaving a 1/2” to 1” gap between where the substrate meets the tub top or shower base. For tiled walls, remove the lowest row of tiles and remove the substrate under the tiles. This gap in the substrate that is left when the wall panels are applied and caulked at the base will allow ventilation. It will also keep water from wicking up into the substrate if and when the caulking is no longer moisture proof.
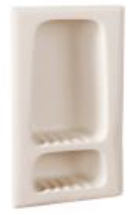
Recessed Shampoo/Soap Holder 8″ x 15″ x 3″ from Aristech
Recessed and Surface-Mounted Accessory Preparation
Location of the wall studs, electrical wiring and plumbing all play a role in where accessories should be placed. Any recessed accessories, such as a soap/shower caddy, are best placed near studs, not on them, and away from the edges of the solid surface panel and any electrical wires. Surface mounted accessories, like a handrail, need to be screwed into studs or 2×6’s installed behind the substrate between the studs. These suggestions are easier to carry out if the substrate is not in place but can still be accomplished by exploratory drilling into the existing substrate to locate studs, or by cutting access holes to prepare the area. For recessed accessories, be sure to cut a receiving hole in the substrate.
Wall Panel Installation
When installing the panels, leave 1/16” between the bottom of the panel and the tub top or shower base for the silicone to get a good bond. Since existing walls are not always square, it may be necessary to scribe a wall sheet in order to get a good fit. Rough cut the sheets with any type of saw and then route them to remove any rough areas left by the saw blades.
Dry fit the sheets to see if adjustments to the edge of the sheet(s) are needed. Scribing is one of the key techniques for installing material against odd shaped or crooked walls for a perfect fit. Once a line is scribed using a pencil and compass, it’s a simple matter of cutting or sanding off the excess material to create the correct fit. (Don’t forget to erase away any pencil marks.) Be sure to leave 1/8″ for expansion and contraction between sheets in the corners, and 1/16” at the bottom.
Cutouts for the faucets and other fixtures can be made with a router or hole saw. Finish off this part of the job by sanding the edges of these openings to remove any chips.
Applying the Silicone
Adhere the solid surface to the wall using 100% silicone sealer and hot melt glue. Apply the silicone to the backside, one inch from the edge around the perimeter of the solid surface sheet. Dot the inner part of the sheet with thumb-size daubs of silicone in a 12” grid pattern.
Once the silicone is in place, apply the hot melt glue to the wall in several places (do not apply it to the solid surface, as it will set from cooling too fast). This will help hold the sheet in place until the silicone dries. Quickly press the sheet in place and hold for a minute or two while the hot melt glue cools and sets.
Next, after cleaning with denatured alcohol, caulk all the horizontal and vertical seams with color-matched silicone. [Pro Tip: In order to get a perfect looking caulked joint, apply a bead of silicone so that it fills the gap. Lightly spray the caulk in the joint with denatured alcohol or Sprayway® window cleaner (don’t use an ammonia-based cleaner) then run your finger along it to smooth it and remove excess caulk. The window cleaner will keep the excess from adhering to the surface.
Installing Trim, Surface and Recessed Shelf Accessories
Always clean the accessory and the surface it will be mounted to with denatured alcohol. For trim pieces, apply color-matched silicone to inside joints. For outside joints use a paintable caulk. Stated differently, solid surface to solid surface joints use color matched silicone; and solid surface to other materials, like a wall, use a paintable caulk. Use hot melt glue to tack the pieces in place until they are set.
For surface accessories that mount in a corner, attach a small block of wood on each wall, with hot melt glue, so they are level with one another. Then rest the accessory, with small daubs of silicone interspersed with hot melt glue (apply hot melt glue last), on the blocks. Hold in place for a minute. Once it is set, remove the blocks of wood by dripping denatured alcohol around them and lightly tapping them with a hammer. Apply silicone around the perimeter where the accessory meets the wall panel.
Recessed Shampoo/Soap Holder in Bone 8010 by Aristech
For recessed accessories, place the accessory, facing inward, onto the wall panel in a location free and clear of wires or plumbing. Trace around the outer perimeter. Draw a new line, to be used to make the cut, on the inside of the traced line by the amount of the width of the front lip of the accessory. Drill a pilot hole and cut out the area with a jigsaw using a fine toothed blade. (Put tape on the bottom plate of the jigsaw to eliminate scratches.) Dry fit the accessory and repeat the cutting if needed.
Apply daubs of color-matching silicone interspersed with hot melt glue (apply hot melt glue last) to the back side of the lip of the accessory where it will contact the wall panel. Hold that in place for a minute or so. Finish with a bead of silicone around the perimeter where the accessory meets the wall panel. Visit Working With Solid Surface and SolidSurface 101 for guides to learning more great fabrication techniques.
Make Your Project Easy
With the ability to choose from the flexible widths from Avonite Surfaces®, your project will be much easier. Not only will you save on time and material, but the finished look is virtually seamless. For more information or to order your new shower components, click here.
I would like more information. My existing show in our master bedroom is 8ft long x 7ft wide x 10ft high. The existing tile does wrap the entire shower to the 10ft ceiling. Also we have a bench in the shower. I am a DIY guy and would like to further this discussion prior to ordering the material.
Looking for 35″ deep 72″ wide 72″ high can you help ?
I am a residential contractor looking to start installing solid surface showers in my homes where Can I purchase solid surface wall panels?