Oh the Things We Can Do!
For all you DIYers out there whose springtime juices are flowing, here are some things you probably didn’t know you could do with acrylic solid surface material such as Corian®, Avonite®, LG Hi-Macs® and many other brands. Simple woodworking tools are all you need to get started.
What is Corian® (a/k/a Solid Surface)?
Solid surface is a manufactured material most commonly used for seamless countertop installations. It is frequently referred to as Corian®, a product developed by DuPont™ in 1964.
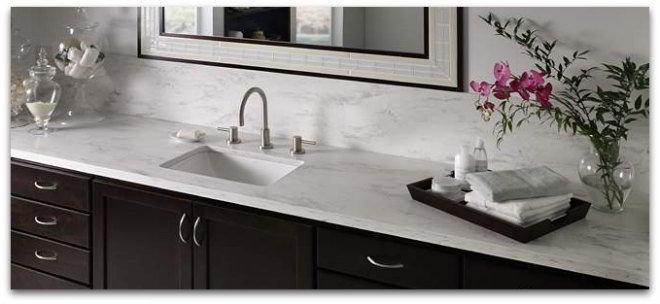
Corian solid surface bathroom vanity tops look like marble.
It can be readily cut, routed and sanded like wood and formed into countertops, shower walls, external cladding for buildings, signage, and furniture where non-porosity and infrequent maintenance are highly valued. These are just a few of the man applications.
Solid surface is made of acrylic resin, polyester resin or a combination of the two that is then combined with filler, color pigments, and acrylic chips. This composition is most frequently extruded or poured as ½” thick sheets that are 30” x 144” and are the same color throughout their thickness.
In addition to being workable like hardwood, it can be heated and thermoformed into curved and molded shapes. It can also be printed on, using dye-sublimation techniques that deposit the ink just below the surface so the image becomes permanent.
What can be done with it?
Thermoform It
Thermoforming (the process of heating and shaping synthetic material) is an increasingly popular way to utilize solid surface to create 3D curves and rounded shapes. This is a realm where other surfacing materials like quartz and granite cannot be used. The ability to thermoform has made solid surface a favorite three-dimensional artistic pallet for designers everywhere.
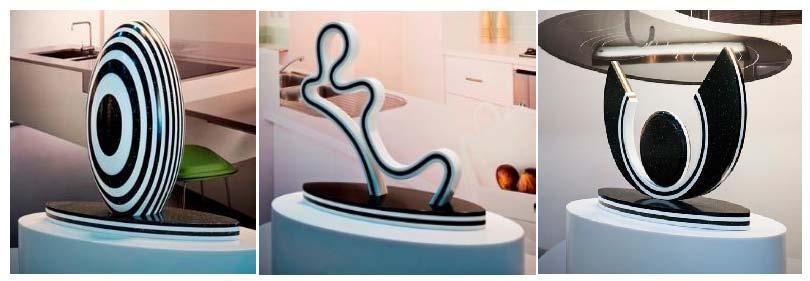
Peter Carman of Dakota Design designed these unique sculptures that were made by thermoforming and inlaying two contrasting colors of solid surface (Staron’s Sanded Onyx and Bright White) to create effective and interesting pieces that showcase solid surface versatility.
Start the process of shaping the solid surface material by heating it to the point that it becomes very flexible, much like a wet noodle. Pay attention to the following factors when shaping the material into a radius or cylindrical shape:
Material Preparation
Cut the material slightly larger than the final dimension as it shrinks after heating. Prior to heating, the edges of the material must be sanded smooth with no chips, cracks or scratches. Small chips, cracks and scratches become the launching point for cracks to develop at a later time.
Heating Solid Surface Material
It is best to heat the entire piece of material. If you heat a small section where the bend will occur, then there may be a tendency for stress to develop at the interface of the heated and not heated portions. The material should be heated to within a particular range of temperatures depending on the composition of the material.
Material Flexibility
Acrylic material is the most flexible when it is heated to the appropriate temperature. A blend of acrylic and polyester is the next flexible, with an all-polyester material being the least flexible. (See the table below for temperatures and approximate times.)
Heating
Be careful not to heat the material too much or too little. Under heating the material and then trying to form it can result in cracking, breaking or stretch marks. Overheating the material may cause it to bubble or blister. Heating the material may also cause it to darken in color.
Bending and Shaping
After the material has reached the intended temperature, remove it from the oven and slowly bend it over or shape it into the desired form. If it is bent too rapidly, it may crack, break, or get white stretch marks. If bent too slowly, it may cool and stiffen too soon. However, don’t worry, as there is generally sufficient time to get the heated material to the destination mold.
Forms and Molds
Create a set of male and female molds from plywood or MDF for the material to be placed on or between while it cools. Let the material cool to below 180 degrees before removing.
Imperfections
Forms and molds will transfer all but the smallest imperfections contained in their surface to the material being thermoformed. One way to eliminate these markings is to line the surface of the mold with tempered hardboard (also known as peg board, but without the holes) stapled in place using small furniture staples.
Conforming
If available, a vacuum membrane forming press can be used to help the material conform to the desired shape. At times, it is beneficial to use a “helper stick” or a shaped piece of wood to coax the material into position. Sprinkle on a light layer of talcum powder to make the process even easier.
Cool Down
Keep the material fixed in place until it reaches 180°F at the surface and then remove the restraints to allow the material to release stress. (NOTE: 180° is the temperature DuPont suggests for Corian, other brands may vary.)
Attend to seaming and other modifications after thermoforming is complete.
Ovens
There are three styles of thermoforming ovens; infrared/radiant, hot air/convection, and platen press. The platen press oven is designed to come in contact with the sides of the material. This process consequently heats the material faster than the other two oven types. No matter what type of oven you decide to use to heat the material, make sure it is large enough to contain the entire piece. Calibrate the oven using the information from the “oven preparation section” of the Corian® Thermoforming Guide.
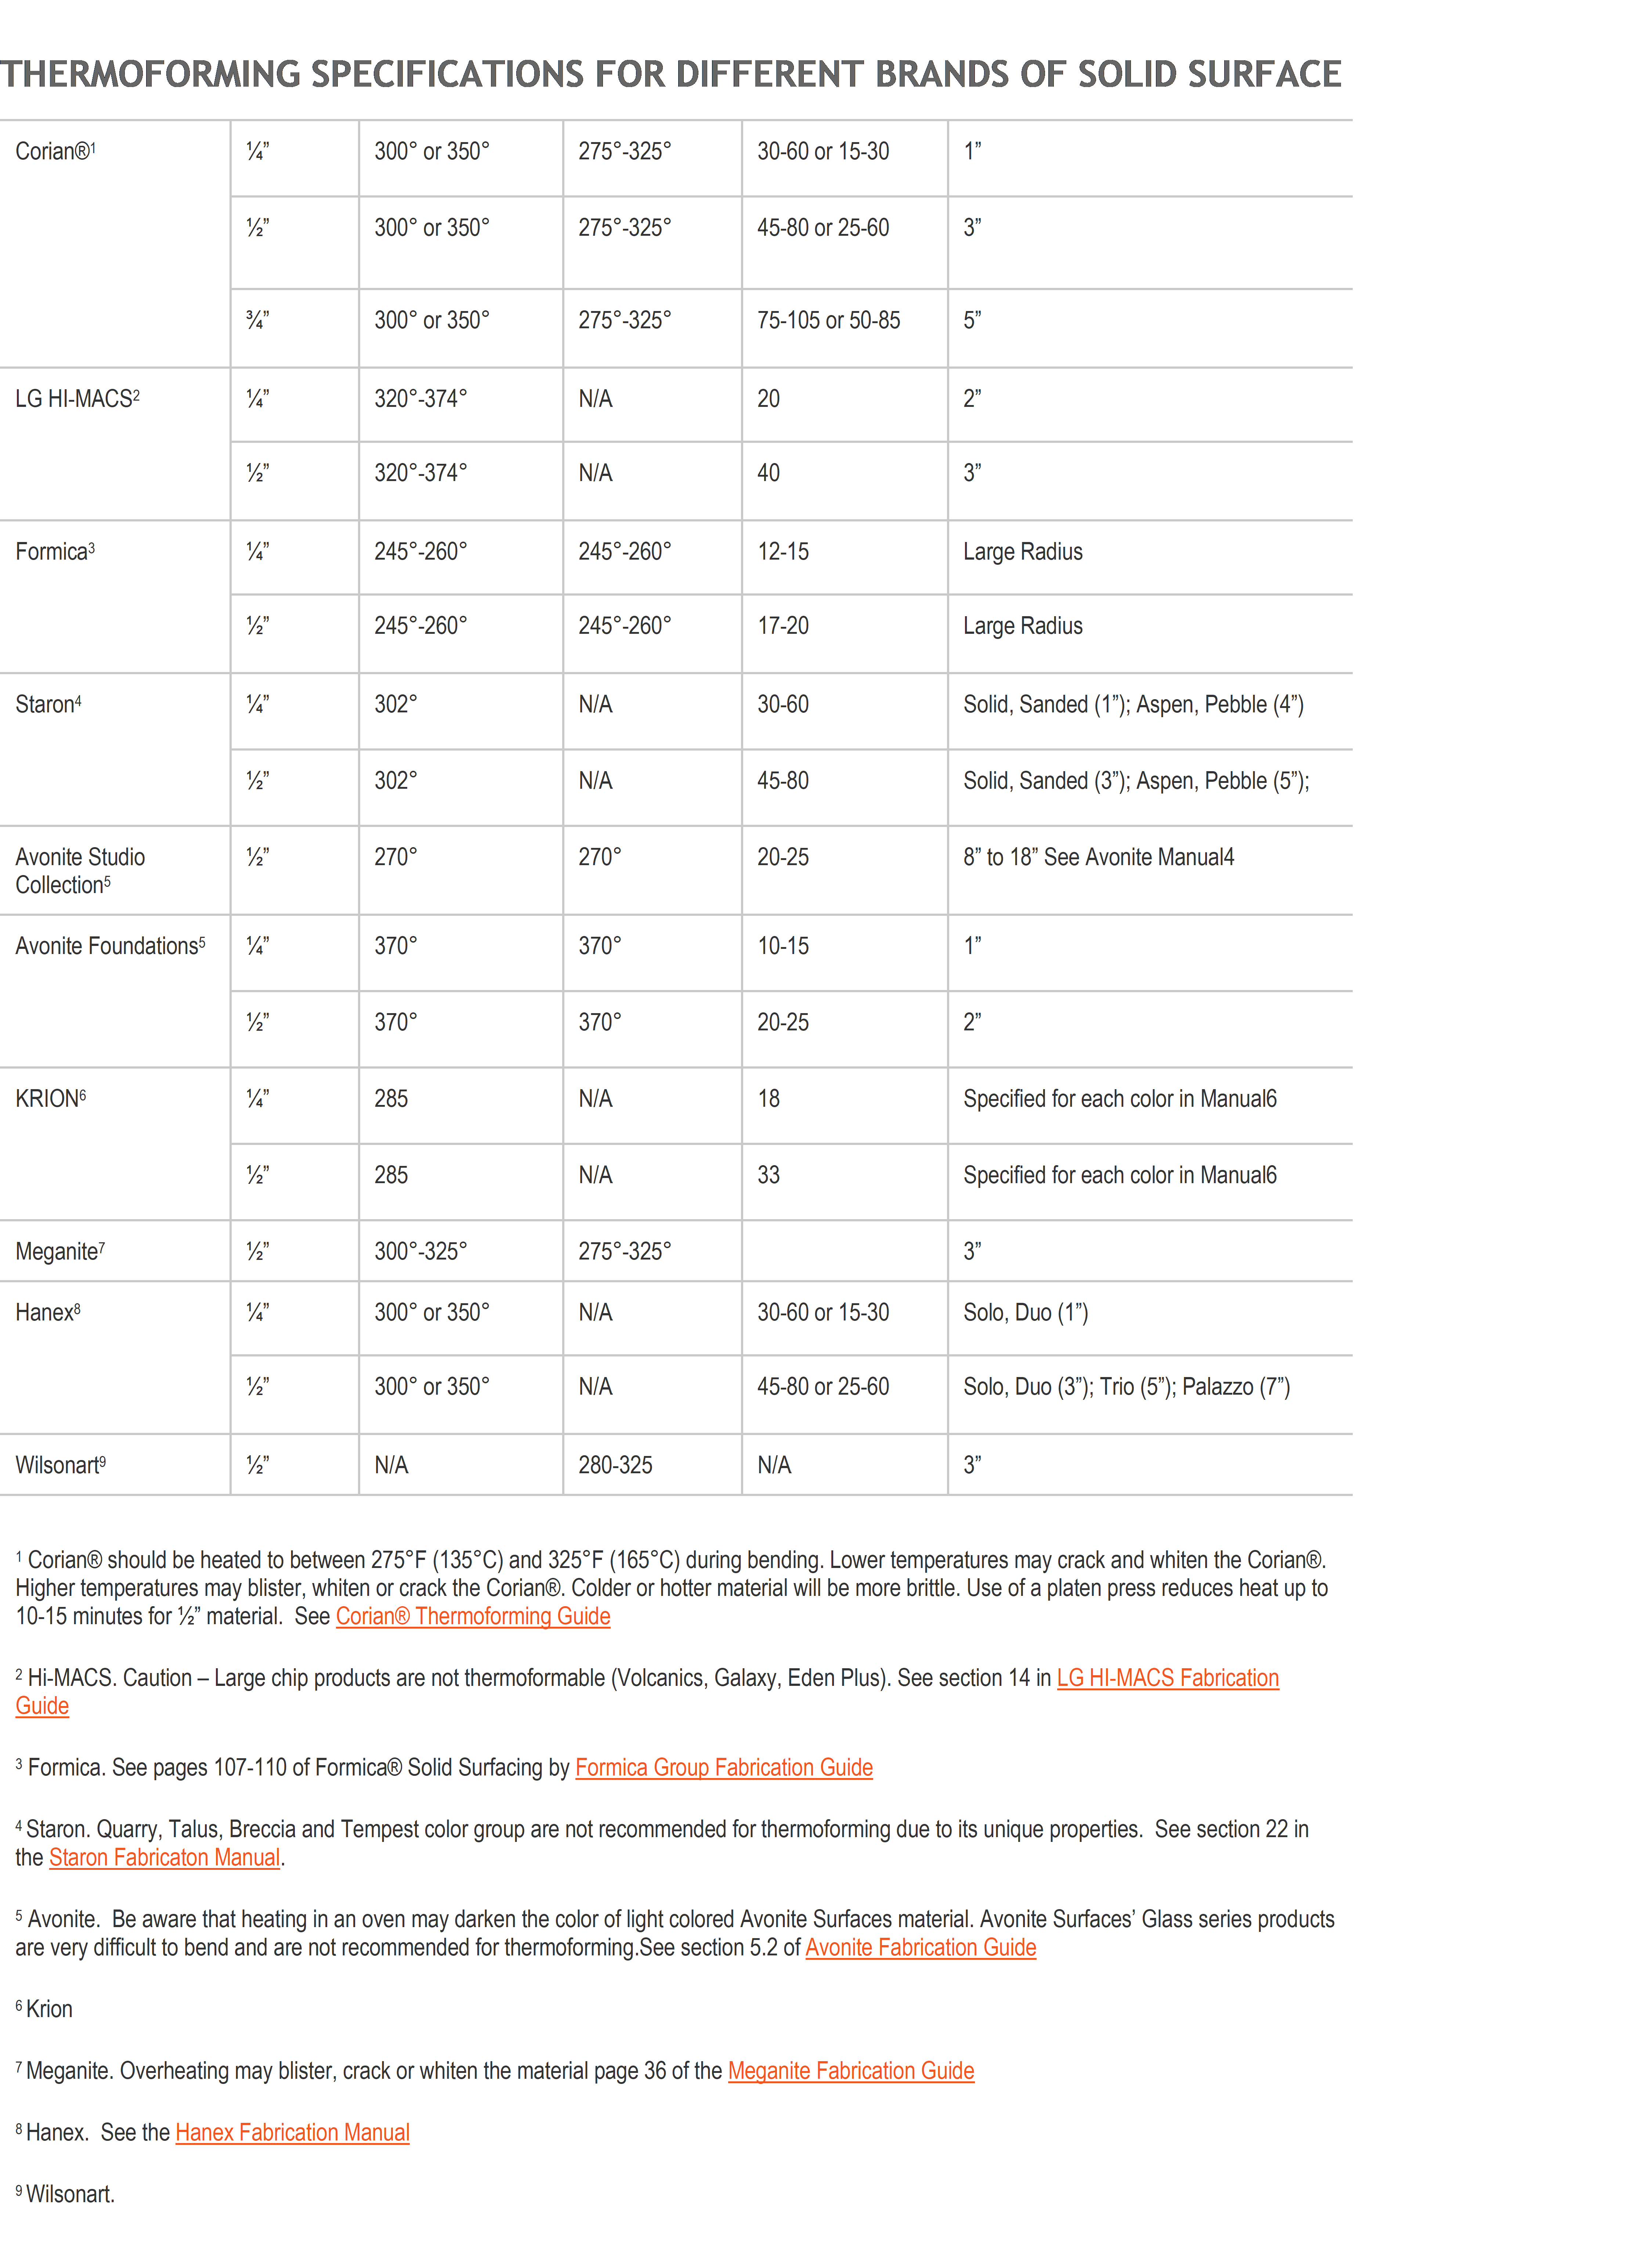
Thermoforming specifications for solid surface by brand.
Dye Sublimate It
Want to add more artistry and pizzazz to your business or home office, dining room, kitchen, bathroom, family room or bedroom? Look no further than Corian® or solid surface!
Thanks to an exciting process called dye sublimation, you can now transfer any design, logo, photograph or image (no matter how simple or complex) onto your solid surface material.
How It’s Done
Although it may look complicated, dye sublimation is really quite simple and the results are impressive! And, as it turns out, solid surface is the perfect medium for the dye sublimation process. This is because successful dye sublimation is dependent upon an acrylic or polyester base for application because of its ability to bond with the gassed ink dyes that are used.
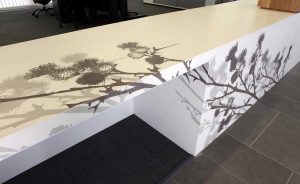
Dye Sublimation in the Scottish Environment Protection Agency’s offices at Inverdee House in Aberdeen, Scotland. Reception desk project by Keppie Design Architects; photo Simon Price. Photograph courtesy of DuPont.
To start, select your desired image or text – a photograph, digital or vector image – and provide it to your dye sublimation specialist. It’s important to check with them beforehand to make sure that your image meets the minimum digital or printed requirements to enable them to create a viable digital image file for sublimation.
After going through their own quality check process, the specialist will then print your desired image to an ink transfer plate and heat up both the plate and the solid surface material. Once the materials reach the proper temperature, a vacuum process is used to transfer the ink on the transfer plate (now in gaseous form) into the Corian® or other solid surface material. (Note: this process may vary slightly between dye sublimation specialists.)
Presto! Your desired image or text is now permanently embedded into the surface, creating a very artistic and unique piece. This printed solid surface piece can now be fabricated, shaped and thermoformed, in the same manner as any other piece of solid surface material.
Think of Your Solid Surface as a Blank Canvas…

Corian dye sublimated and then thermoformed into a vessel sink. From: http://exxstone.cz/files/2015/02/CORIAN_sublimace.pdf
Just like Van Gogh, Monet, Picasso or Warhol, envision your solid surface material as a blank canvas just waiting to spring to life with whatever imagery you desire. Through the dye sublimation process, virtually anything you can imagine can be masterfully transferred into your solid surface. Possibilities range from larger endeavors like business signs, paneled installations, wall décor and artistic flourishes added to countertops to smaller projects like promotional goods, coasters, hot plates, trivets or customized trophies or gifts.
Dye sublimation is unique, in that the process permanently embeds and preserves your selected image or text in the actual solid surface substrate. As a result, you also have the creative flexibility to choose between a matte or high gloss finish for the final touch.
Quite literally, dye sublimation allows your imagination to be the limit on what you create. So, what do you say, are you ready to let your inner artist out?
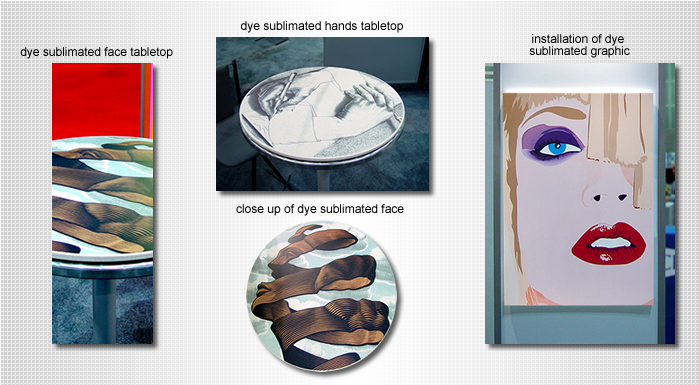
Dye sublimation in various design concepts developed by R.D.Wing Co., Inc., for the AIA 2006 Convention, DuPont Corian Booth. Photo courtesy of R.D. Wing Co., Inc.
Dye Sublimation in the Pediatrics and Pediatric Emergency Reception Area of the Hospital Universitari Sant Joan de Reus, Spain, Decoration by FernandezCoca.com; Photo courtesy of curArte and DuPont.
Use it Vertically
The installation process for solid surface vertical applications, such as shower walls, tub surrounds, wainscoting and wall cladding are procedurally very similar, therefore we’ll address them as a group.
Dry and Wet Locations
To begin with, make sure the wall surface that the solid surface material will be adhered to is sound and made of the correct materials for the intended use. For dry locations, the supporting wall material can be a sound tile or plaster surface, MDF particle board, drywall/sheetrock, moisture-resistant plywood, or cement backer board.
For wet locations that are above grade (in a portion of a building that is above ground), amend the materials list above as follows: do not use MDF, use marine-grade plywood and use moisture resistant drywall/sheetrock. If the wall you are installing on is below grade (in a portion of the building that is below ground, like in a basement), it is not recommended to use solid surface due to moisture seepage into the wall.
Fastening
Before fastening the solid surface sheets in place, fit, scribe and cut, or sand the edges if need be, to ensure the sheets fit correctly. If two or more sheets need to be seamlessly joined, mirror cut and seam them together with a solid surface backing strip glued in place, as described in the earlier section on seaming. The wall surface will need to be notched to accommodate the thickness of the backing strip since it is on the back facing surface of the seamed sheets. Prepare the edges before seaming by using a tongue and groove router bit set or a wavy bit set. This will help insure the sheets are level with each other and minimize the amount of sanding required to hide the seam location.
Fasten the solid surface sheets to the wall by placing 100% silicone sealant around the entire perimeter of the sheet. For the interior of the sheet, use thumb-size daubs of silicone every 8-12 inches in a grid pattern. Alternatively, you can also run vertical beads of silicone every 8 inches. However, if the wall surface is uneven, the tall daubes of silicone are generally a better choice since they will span the gap from the wall to the back of the solid surface sheet.
You can use large blobs of hot melt glue to hold the sheets in their final position while the silicone cures. To do this, pull the sides or edges away from the wall just enough to place the large blobs of hot melt glue, and then press and hold in place until it solidifies. You can also use braces to hold the sheets correctly in place and forgo using the hot melt glue.
Flat Wall Treatments
For flat wall treatments, like shower walls, tub surrounds, wainscoting and wall cladding, there are three popular ways to deal with the flat seams where two panels come together. The first is called a batten strip. It is usually an inch or more wide with eased edges (edges that are rounded) and is held with silicone over the 1/8” seam, which is also filled with silicone. A second option is to silicone the seam and then leave it uncovered. A third option is to create a “hard seam” by gluing the sheets together with solid surface adhesive. If constructed well, this seam will not be visible.
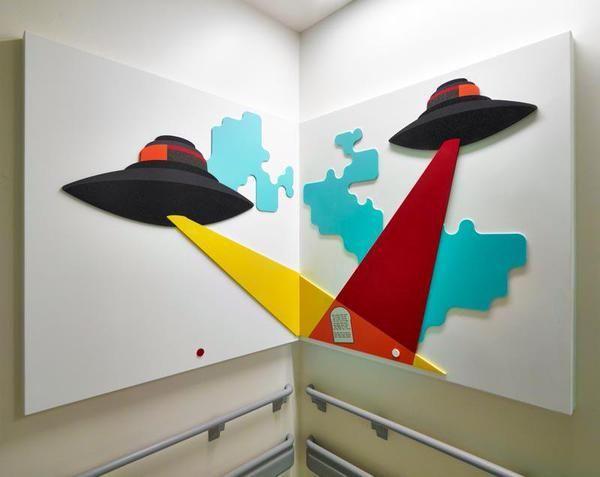
Mark Hill’s work in Corian provides a colorful mural at the Glasgow Children’s Hospital.
When you are working with large expanses of solid surface, the length of sheets that can be “hard seamed” is limited. This distance is limited and determined by the variation of temperature that exists. For example, if the temperature varies, from high to low, by 40 degrees, then the maximum length the seamed surface can be is 18 feet. However, if the temperature only varies by 10 degrees, then the length can increase to 72 feet. Therefore, a silicone joint that allows for expansion or contraction needs to be placed every 18 feet or 72 feet, respectively. You can refer to DuPont’s technical bulletin, “Dupont Surfaces: Dupont Corian Solid Surface Commercial Interior Surface Installation” for more details and information.
Corners
When working within an inside corner, it is recommended to use a silicone soft seam where the sheets come together. You can then either leave the seam like this or use one of several decorative trim covering options to make it more aesthetically pleasing. These trim pieces range from a triangular strip, to a coved strip affixed with silicone over the corner. Hard seaming is also an option but requires special fabrication tools or thermoforming. Outside corners can be either hard or soft seamed. These treatments are explained with diagrams in the Dupont Surfaces, technical bulletin.
Showers and Tubs
When working with showers and tubs, install the back wall first and leave 1/8” on all sides for expansion. Scribe and cut the sidewalls and cut any needed holes with a roto-zip tool, router or hole saw. After you attach the sidewalls and they are set, wipe with denatured alcohol in the places where silicone will be applied. Apply silicone from the bottom up and remove any excess with denatured alcohol after it sets. Wait to apply silicone until after the denatured alcohol has evaporated.
Wainscoting and Wall Cladding
When using solid surface for wainscoting (paneling) and wall cladding, leave a 1/8” gap at top and bottom and inside corners and apply silicone around the edges to allow for expansion. Attach the panels to the wall in the same manner as described above.
Make sure to use a router for cutting the solid surface material or dressing the edge of a saw cut piece of material. A router creates a smooth edge, whereas a saw leaves a marked edge that may lead to fractures. Eventually, using a saw can create fractures or cracks that can extend into the material and create larger cracks.
When attaching solid surface baseboard or chair rail moldings, apply silicone in continuous beads near the top and bottom of each strip, which allows for expansion and contraction. Apply hot melt glue in dabs to hold the molding in place while the silicone is setting.
Remember: solid surface expands and contracts a fair amount, therefore, it should not be adhered using a hard seam adhesive or it will break itself loose.
Finishing Touches for Solid Surface
One of the really excellent characteristics of solid surface is that no finishing touches like paint, varnish, sealers or oils are needed. The desired shine, or lack of, is achieved with the final sanding grit. This ease of finish is a future plus if or when the surface becomes soiled or has a blemish. It can be removed with soap and water, cleaners, scouring powder, or sand paper, depending on what is needed. Now your surface is ready to provide years of enjoyment and low maintenance use.
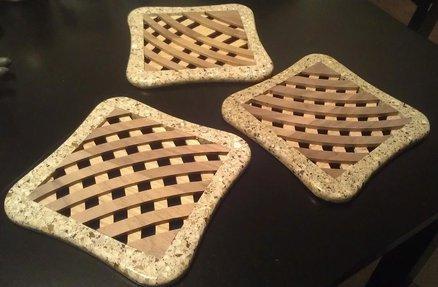
Walnut & Oak Trivets with Solid Surface Frame
Who Can Purchase Solid Surface & Where?
Solid surface can be purchased in sheets from many places. Distributors sell solid surface, but generally only to professionals. Non-professionals can typically find and purchase solid surface through online marketplaces, such as SolidSurface.com,
eBay or Craigslist. SolidSurface.com offers almost all brands as well as accessories needed to work with solid surface. It is one of the few places where currently stocked full sheets along with remnants of solid surface are available to anyone including the woodworker, cabinet maker, remodeler, fabricator, signmaker and DIYer.
Endless Possibilities
Whether you choose Corian® or any other brand of solid surface, the creative possibilities are endless. Create something unique with solid surface, thermoform it or use the dye sublimation technique, for your next DIY project.

