Author Archives: Ed

The New Mystera: The Unique and Popular Solid Surface Returns in 100% Acrylic

Mystera Bathroom
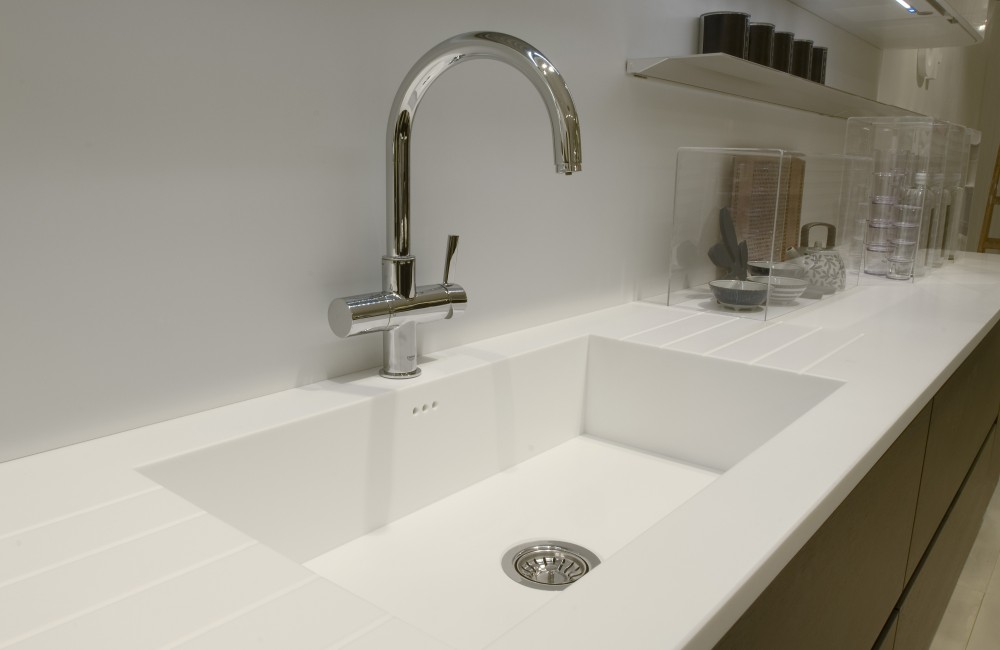
Mystera was the first solid surface product, developed in mid-1990’s, to successfully emulate the look of natural quarried stone with the use of multi-colored, multi-directional, swirls and veining, in addition to traditional inclusion of large and small particulates. This set in motion a new look for the solid surface industry, with many brands following their lead.

Today, Mystera is back and better than ever!

With the re-introduction of Mystera you’ll benefit from higher performance standards and new contemporary styles, at very competitive prices.

Continue reading

Guide to Finding Corian® Glacier White and Other Solid White Solid Surface Material

Did you know that White is the most sought after color of the many hundreds of colors and patterns of solid surface? White is not only classic and aesthetically bright, it also provides a wonderful visual representation of solid surface’s naturally antiseptic nature.

While DuPont’s Corian® Glacier White is one of the more widely known and highly popular versions of white, there are also many other equally desirable white solid surface options available that may satisfy the needs of your project.  We thought it may be useful to put together this handy guide that presents the various white options available through SolidSurface.com:

DuPont Corian® Glacier White

Although Glacier White is not part of the standard stocked product offering at SolidSurface.com, it does frequently come into the overstock “full” and “partial sheet” inventory.  When items do become available, they frequently sell out fast. We suggest if you are interested in an item you either immediately grab it, or contact us to place a hold on it for you.

View the overstock Corian® Glacier White selection at SolidSurface.com

Select Grade Glacier White

The next best alternative to DuPont Corian® Glacier White is the Select Grade. Select Grade Glacier White is 100% acrylic solid surface made in the USA and matches the color of Corian® Glacier White. Select Grade is material that did not meet the manufacturer’s precise specifications and is made available under our overstock full and partial sheet inventory.  However, the majority of these ‘imperfections’ cannot be detected to an untrained eye, if even then. (Learn more about Select Grade.)

The primary benefits of Select Grade are that it is still a very high quality material offered at a considerably less expensive price.  Even more dramatic discounts are available when you purchase the material in 8-pack quantities or more, when available.  Both ½” & ¼” thick material are frequently listed in the overstock inventory.

View the Select Grade Glacier White selection at SolidSurface.com

Solid White Available From All Brands

Just about every brand of solid surface offers some type of solid white color.  There are many shades of solid white to choose from in a variety of different names, including Glacier White, Arctic White, Antique White, Alpine White, Bone or Ivory White and many more.  If you have a specific shade of white in mind for your project, its a good idea to locate physical samples for the options available.

SolidSurface.com offers an array of solid whites in both stocked full sheets and overstock full and partial sheets from many different brands including LG HI-MACS, Samsung Staron, Formica Solid Surface, Hanex and many more.  The best way to view what is available in both stocked and overstocked inventory is to visit the link below which displays a page that pre-filters the search options by “White” color family, “Solid” pattern, “Full Sheet” size and sorts by “Color Hue”.  All items listed are considered stocked (in-production and consistently available), unless the name contains “overstock” (limited availability).

Visit all of the solid white full sheets available at SolidSurface.com

For additional guidance on how to find material on SolidSurface.com, visit How to Find Solid Surface Material on SolidSurface.com


How to Make Solid Surface (Corian®) Windowsills

Using Corian® or solid surface window sill treatment is a great way to create beautiful, long lasting, water-damage proof, windowsills for your windows. It’s time to let go of your fears of what will happen to your windowsill surface if you accidentally over water your plants, forget to close the window during a rainstorm, or if condensation builds up on the inside of your window and drips on the sill. Breathe easy—these mishaps have no effect on non-porous, solid surface windowsills!

Solid surface material has many attributes that contribute to making a windowsill a labor of love and ease. Here are six…

  1. No grain and is Non-porous.
  2. Cuts and sands like hard wood.
  3. Virtually “seamless” after gluing pieces together.
  4. Sunlight and UV resistant.
  5. No coating to peel or fade.
  6. Won’t rot, mold or mildew.

The Evidence Speaks for Itself

Solid Surface Window Sill

Picture 1. Solid Surface Window Sill.

Solid Surface Window Sill

Picture 2. Solid Surface Window Sill.

As you will see, solid surface windowsills speak for themselves. Pictures 1 and 2 below show a Corian® Glacier White window sill that has been in place 17 years and has always had plants sitting on it. This sill has withstood water rings and if a metal pot left a rust ring on the sill, Comet and a Scotch Brite pad removed it with a few scrubbing motions. Otherwise, maintenance consisted of simply wiping it clean with a damp cloth.

In the first picture you can see the three main components that make up the sill: 1) The overhang that extends down at the front of the sill; 2) the ends (ears or wings) of the sill that extend beyond the edge of the window casing; and 3) the flat surface between the overhang and the window that is commonly referred to as the deck.

Create Your Own Corian® or Solid Surface Windowsill

windowsill-figure-01 windowsill-figure-02To create this sill, glue together three strips of solid surface material to create the overhang and ear (or wing) portion of the sill. (Figure 1.)

Next, glue the three-strip portion to the front edge of the deck piece that sits in the sill area. (Figure 2.) Notice, that even though there are three seams present, there is no evidence of their existence after the excess glue squeeze-out is sanded away. Building the overhang in this fashion is advantageous because it can be sized so the wings and overhang are exactly what you want, without having to trim them to size after they are glued to the deck piece.

It’s a lot easier to create and finish some aspects of the overhang prior to gluing it to the deck piece. For example, trimming the wings to fit around the window casing is not necessary if the pieces that make up the overhang are sized correctly before attaching them to the deck. On the other hand, routing a profile on the overhang is easier if it’s crafted after the overhang is attached to the deck. Remember to leave ⅛” on either end of the deck to allow for expansion.

Once the windowsill is completed and dry fitted to the windowsill area, it’s ready to be attached. The sill must be supported by an adequate substructure of either wood or masonry materials. Depending on what it’s being attached to, you may want to include an insulation layer like a thickness of wood or other insulating sheet under the deck of the sill. Attach the deck of the sill to the substructure with several daubs of 100% silicone sealer.  Apply a 100% silicone bead of caulk around the perimeter of the deck and overhang to stop water seepage and let it set overnight. Now you can enjoy your new trouble free windowsill for years to come!

How to Make (Corian®) Solid Surface Shower and Tub Walls

There are many compelling reasons to use Corian® or another solid surface material in your bathroom. These range from aesthetics, to ease of cleaning and its antiseptic properties, to its durable nature. And if that’s not compelling enough, did you know…if you’re like the average person, you will take a shower 7,300 times in your lifetime? That’s a lot of time spent in your shower space. If that’s not a compelling enough reason, we don’t know what is!

Mystera Solid Surface used for bathroom countertops, shower walls, and wainscoating.

Mystera Solid Surface used for bathroom countertops, shower walls, and wainscoting.

Corian® and solid surface material can be found in virtually any color and hue. There are solids, small and large particles and veined or swirled patterns to choose from (See Image 1. Example of veined product called Mystera.) It’s as simple as choosing that perfect color to adorn your walls from the lists of hundreds of solid surface colors available.

Cleaning solid surface is a breeze compared to tile, granite, cultured marble, natural marble and quartz. Tile has grout lines that can collect soap scum and mold and granite is porous and easily stained. Cultured marble possesses a gel coat finish that is vulnerable to scratches and natural marble can be eroded with acidic cleaners. You also need to be careful not to scratch quartz with abrasive cleaners. In sharp contrast, you can easily clean and remove stains and scratches from solid surface using cleaners like Comet and by simply using sand paper.

Durability is also a hallmark of solid surface materials.  It is nonporous and invites the use of both abrasive and chemical cleaners. This nonporous quality also effectively inhibits the growth of mold, mildew and bacteria, making it a perfect candidate for your shower or bath.

Installing Shower and Bathtub Walls (Surrounds)

So, you’ve decided to surround yourself with Corian® or another solid surface material for one or more of those “7,300” showers or baths that we mentioned previously. Now it’s time to get down to the nuts and bolts of installation.

Let’s start out determining how much material will be required.  For bathtub surrounds the long wall will need two sheets. Two sheets may be needed for the end walls as well, depending on the size of the tub enclosure. Showers may or may not need more than one sheet per wall, but most will likely have at least one wall that will. Shower and tub surrounds are usually made from 1/4″ solid surface material, but 1/2″ material can just as easily be used, it’s just not as flexible and heavier.

Since existing walls are not always square, it may be necessary to scribe a wall sheet in order to get a good fitting cornerRough cut the sheets with any type of saw and then route them to remove any rough areas left by the saw blades. Dry fit the sheets to see if adjustments to the edge of the sheet are needed.

Scribing is one of the key techniques for installing material against odd shaped or crooked walls for a perfect fit. Once a line is scribed using a pen and compass, it’s a simple matter of cutting or sanding off the excess material to create the correct fit. If the wall is narrower than 30″, use a narrower, square sheet of material, scribe it, and then transfer the scribe to the actual piece.

Make sure to leave 1/8″ for expansion and contraction between sheets on the long wall(s), in the corners, and at the bottom. Cutouts for the faucets and other fixtures can be made with a router or hole saw. Finish off this part of the job by sanding the edges of these openings to remove any chips.

Dry fit the pieces and make any necessary adjustments. You can bond the solid surface material to any wall that is constructed out of water resistant drywall, cement board or the previous wall if it is sound and water resistant (but not particle board). Coat the surface with a white primer suitable for adhering properly to that type of surface to keep this wall from showing through the 1/4″ solid surface. For 1/2″ solid surface this is not as likely to happen.

Adhere the solid surface to the wall using 100% silicone sealer and some hot melt glue. Apply the silicone to the backside, one inch from the edge around the perimeter of the solid surface sheet. Dot the inner part of the sheet with thumb size daubs of silicone in a 12” grid pattern. Once the silicone is in place, apply the hot melt glue to the wall in several places (do not apply it to the solid surface, as it will set too fast.) This will help hold the sheet in place until the silicone dries. Quickly press the sheet in place and hold for a minute or two while the hot melt glue cools and sets.

Next, after cleaning with denatured alcohol, caulk all the horizontal and vertical seams with color matched silicone. [Pro Tip: In order to get a perfect looking caulked joint, apply the bead of silicone so that it fills the gap. Lightly spray the caulk in the joint with denatured alcohol and run you finger along it to smooth and remove excess caulk. Any excess can be removed with denatured alcohol on a clean white cloth.]

To create a different look other than exposed caulked seams, do the following:

    • Batten strip, or turn around and use as corner molding, for covering seams.  Adhere to wall with silicone.

      Batten strip, or turn around and use as corner molding, for covering shower wall seams. Adhere to wall with silicone.

      Batten Strip—a batten strip made of 1/4″ or 1/2″ solid surface can be used to cover the seam in the long wall. It can be whatever width you like, but about 1-1/4″ to 1-1/2″ is good. Take a look at the batten strip from 1/4″ material in Figure 2 below. It has 45-degree bevels on the two edges that leave 1/16″ of the edge unbeveled. Place two small beads of silicone on the full length of the backside of the strip and position it over the seam and press it into place. You can use hot melt glue or tape to hold it in place. Remove any squeezed out adhesive with denatured alcohol on a white cloth.

    • Corner Moulding—use the exact same strip to cover the corner seams. Invert the strip in the corner so it spans the corner at a 45-degree angle.  Apply small beads of silicone the full length of the strip and press into place. Treat any adhesive squeeze-out as discussed above. Use tape to hold the moulding in place until the silicone sets.
    • Edge Trim— For 1/4″ thick walls, the trim to go around the top and sides can be created from 1/2″ thick solid surface. Cut a 1/4″ deep notch (rabbet) in a 1-1/4″ to 1-1/2″ wide strip of 1/2″ solid surface. Ease (round over) the outside corners and edges of the trim strips. Fasten the trim in place by using silicone on the part of the trim that laps over the sheet on the wall, as well as to the trim that butts against the original wall. Trim is not needed for a 1/2″ wall. Instead, use a router to create an edge profile or just ease the edge.
  • Invisible Seam—use a hard seam with color matched solid surface adhesive to create a seamless joint where multiple sheets of solid surface are being installed. There are two ways to approach creation of an invisible seam:
    • Cut them by using a mirror cut and then use a tongue and groove or a wavy edge seam router bit along the joining edges. Using one of these style bits will make it easier to align the two sheets when joining them with adhesive. This also reduces the amount of sanding needed to make the two sheets flush. Fasten this sheet to the wall by apply a large bead of silicone to the backside of the seam, in addition to the normally applied silicone detailed above.
    • Hard seam a backing strip of 2″-3″ to the back of one of the sheets. Leave half of the backing strip sticking out and make sure no adhesive remains on the portion sticking out. Notch the wall so the backing strip does not get in the way when the sheet is adhered to the wall. Once that sheet is in place, hard seam the second sheet in place. After you sand away the glue squeeze-out the seam should disappear. (NOTE: Do not hard seam corner joints since this will eliminate the space needed for expansion.)

Visit our Working With Solid Surface and SolidSurface 101 guides to learn more great fabrication techniques.

Tips for Successfully Seaming Corian® & Other Solid Surface Brands

Integra Adhesives

Integra Adhesives

Have you ever spent hours correctly measuring, cutting and fitting pieces of Corian® or other solid surface material together, only to have your seams fail? If you have, then you know how frustrating this can be!

How do you avoid this? The key is to keep your solid surface adhesive live and performing throughout the fabrication process. Here are some highly effective strategies for storing and applying adhesive to ensure the best possible performance and seaming success:

Adhesive Care

  • Store adhesive upright in a cool dry place that is away from direct sunlight.
  • Store adhesive in an air-conditioned room or a refrigerator designed for the storage of flammable products to extend its shelf life. (NOTE: Do not store adhesive alongside food.)
  • Store upright to allow any trapped air bubbles to reach the top (outlet) of the cartridge and be eliminated during the initial purge. To purge, hold the cartridge at an upward angle, mixing tip NOT attached, and dispense approximately a tablespoon into a disposable container like a paper cup. Make sure you see adhesive dispensing from both sides of the cartridge.
  • Do not use the adhesive if it has been exposed for an extended period to high temperatures during transport or storage. In this situation, the activator (catalyst) may break down and lose strength.
  • High temperature decomposition of the activator can also release gasses into the activator component, which may impact the consistency of the cure, leaving uncured spots.

If stored correctly the adhesive can last for a year. However, the activator portion will slowly lose reactivity over time. If in doubt, run a test by dispensing a ¼” bead on cardboard and if a slow, uneven or incomplete cure results, discard the adhesive.

In addition to properly caring for your adhesive, following these eight performance guidelines will help ensure successful seaming during your fabrication process:

Performance

  • Allow both the adhesive and solid surface sheet material being joined to reach a room temperature of at least 60 degrees Fahrenheit (18 degrees Celsius) before assembling.  Bringing material into a warm humid room after being cold can cause moisture to condense on the surface, which can interfere with bonding.
  • Fabricating cold sheets in a warm room will cause the adhesive on the edge of the joint to cure faster than the adhesive deep in the joint. This is because cold solid surface materials absorb a significant portion of the energy from the chemical reaction, resulting in less than optimal curing conditions. This can ultimately cause a weakening of the seams in those areas. It is best practice to let the sheets reach room temperature.
  • Another reason to allow cold adhesive to return to room temperature before use is that some adhesive components become thicker at low temperatures. This creates higher pressure that may flex the cartridge wall and throw off the mix ratio.
  • If you re-warm adhesive, make sure the cartridge outlet plug is in place rather than the mixing tip. Adhesive left in the tip will warm faster and may expand back into the activator chamber where the two components will harden and result in a plugged cartridge.
  • Never expose adhesive to high heat. Warming adhesive above 110 degrees Fahrenheit can damage the activator component.
  • When gluing pieces together, run two small beads (one over the other) instead of a larger single bead. Overlapping adhesive streams will greatly reduce the possibility of under cured areas caused by air bubbles, from the activator side of the cartridge, mixing in with the base component in place of activator.
  • Use the full stroke of the trigger to maintain a smooth and constant feed pressure. Quickly re-trigger the gun and continue this technique until dispensing is complete. This application technique will help to prevent adhesive from seeping out of the tip between strokes. Using a dripless adhesive gun is also beneficial.
  • Apply as little pressure as possible to dispense the adhesive and maintain a constant forward motion of the cartridge pistons to minimize off-ratio dispensing. We recommend an 18:1 thrust ratio on the gun for smooth dispensing.

Here’s to Your Seaming Success!

Using a quality dispensing gun and quality adhesives, storing them correctly and following the simple procedures outlined above will result in a flawless seam most every time. If the viability of your adhesive is ever in doubt, simply run a ¼” diameter test bead on some scrap cardboard for a couple of feet and look for slow, uneven or incomplete cure results. Once you are certain you have live and performing adhesive, you’re fabrication process should go seamlessly!

Visit our Working With Solid Surface guide to learn more great fabrication techniques.