Author Archives: Ed

10 Qualities of a Great Solid Surface Adhesive Dispensing Gun

Solid surface adhesive dispensing guns have evolved to become an easy to use and essential part of fabricating solid surface. A few years ago the adhesive came in two separate containers. You then had to mix it together in a paper cup with a wooden stick, similar to a doctor’s tongue depressor.

After that you could spread the adhesive mixture onto the solid surface joint with a stick. It was a tedious, time consuming and messy process with plenty of opportunity for mixing ratio errors. If the correct amount of catalyst was added to the base component in the ratio of 10 base to one catalyst, and the temperature in the facility was right, then the adhesive would set (harden) in 20-30 minutes. In this case, the project could move along as planned.

If too much catalyst was added, then the set time would be shorter. However, the challenge in this case is that  you wouldn’t be aware of this until it started to set, making it too late to position the components. This would leave you with an excess of gelled adhesive that would have to be removed before the job could go forward.

If too little catalyst was added, the set time would be extended. In this instance you wouldn’t know it until the pieces were in place, forcing you to wait until the adhesive had set. This process could take hours, once again resulting in a project delay.

Adhesive guns have come a long way!

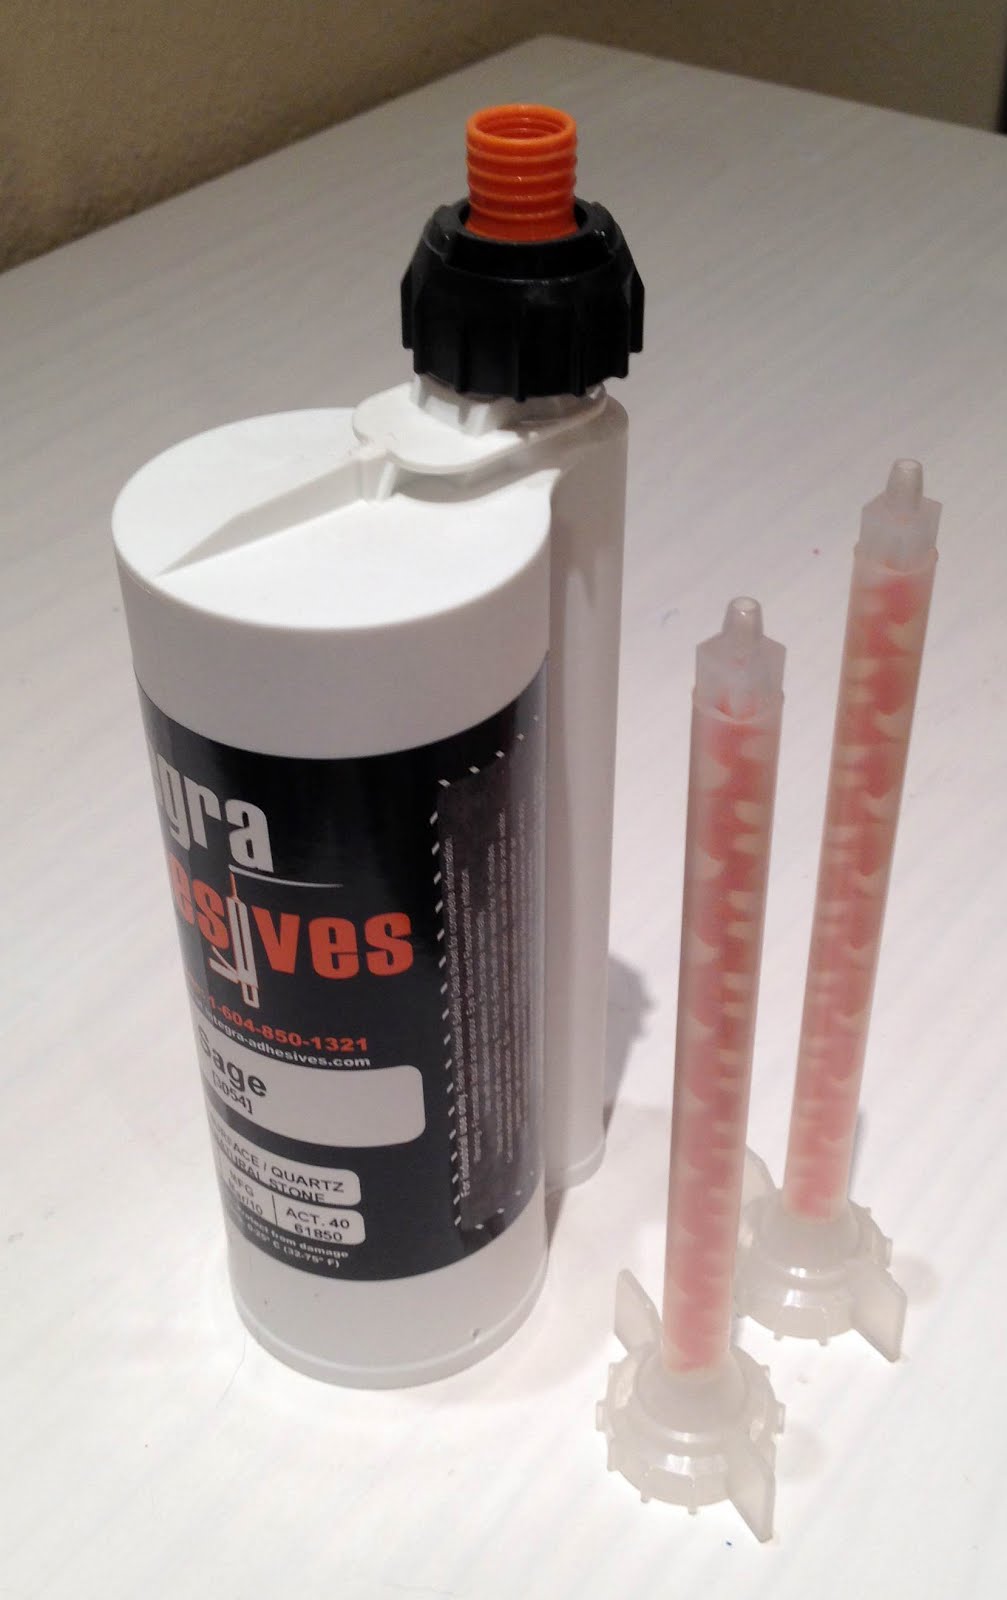
Today, almost every adhesive brand comes in a two cylinder cartridge. The larger cylinder holds 10 times more base component than the smaller cylinder that contains the catalyst. This is where the terminology 10:1 adhesive comes from. [See Photo 1]


Photo 1: Integra Adhesive 10:1 ratio adhesive cartridge and mixing tips.

This delivery design allows for the same ratio of adhesive to be dispensed, cartridge after cartridge. When you pull the adhesive gun trigger, the adhesive in the cartridge is applied directly to the solid surfaces to be joined. This results in a lower risk of project delays due to improper component ratios.

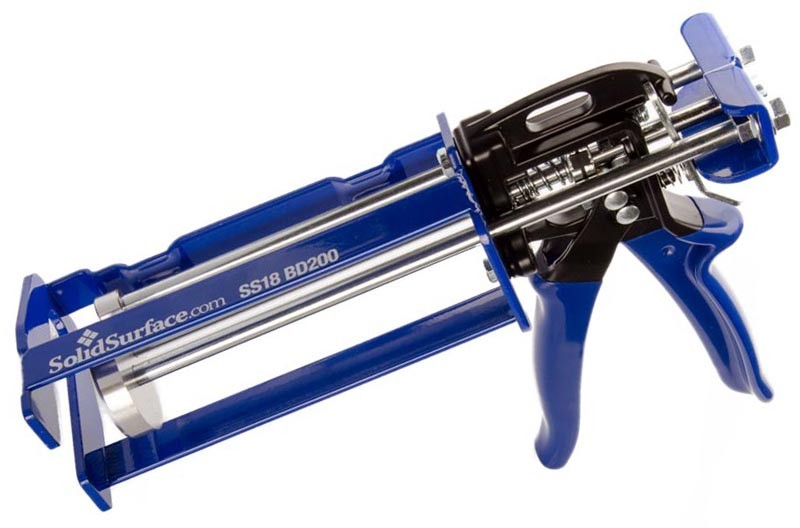
The Top 10 Qualities of New Solid Surface Adhesive Dispensing Guns

Now, let’s consider the top evolutionary qualities of the new solid surface adhesive guns and how they can positively impact the success of your project:

  1. Possesses a “dripless” feature so when you release the trigger (in order to squeeze the trigger again) the adhesive doesn’t run out.
  2. Fits 250ml adhesive cartridges from Integra, Sta-Put (Plexus), HI-MACS, Avonite®, Formica®, and Wilsonart® (Gibraltar) and others.
  3. Has a comfortable padded grip to help prevent hand fatigue.
  4. Possesses an 18:1 thrust ratio so you can use a moderate controlled hand pressure to make sure the adhesive flows evenly from the tip.
  5. Has twin precision gripping plates that carefully control the advancement of the pistons.
  6. Contains a “wear adjustment” screw to keep the gripping plates configured properly.
  7. Capable of dispensing high-viscosity solid surface adhesive.
  8. Has a thumb-activated rear lever to instantly stop dispensing when completed.
  9. Contains extra durable, heat-treated piston push-rods that resist wear and misuse.
  10. The durable cartridge cage is made of steel for long life.

How do these top 10 qualities fit into the task of seaming solid surface?

Lets take a look at the actual steps that promote a good bond and successful project:

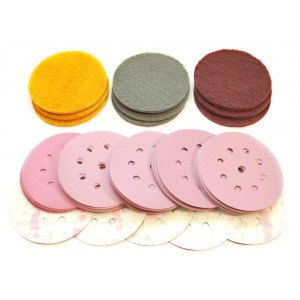
  • First, cut and position the solid surface components so they are ready for the application of adhesive. (It also helps if the material is allowed to reach the temperature of 60 degrees or warmer.) [See Photo 2]


    Photo 2: Prepare the material and tooling.

  • Place the cartridge in the gun and pull the trigger to position the gun pistons correctly behind the cartridge.
  • Open the cartridge, and hold the gun at an upward slant with a paper cup under the cartridge openings. Pull the trigger so a small amount of materials are dispensed from both cylinders of the cartridge. (Make sure you see material flowing from both cylinders.)
  • Place the mixing tip in place and tighten the retaining nut to hold it there.
  • Pull the trigger so that adhesive flows through the mixing tip and onto a scrap piece of cardboard or into the cup. Dispense a blob about the size of a quarter to make sure it is flowing properly. [See Photo 3]


    Photo 3: Purge a small amount of adhesive to ensure a good mix.

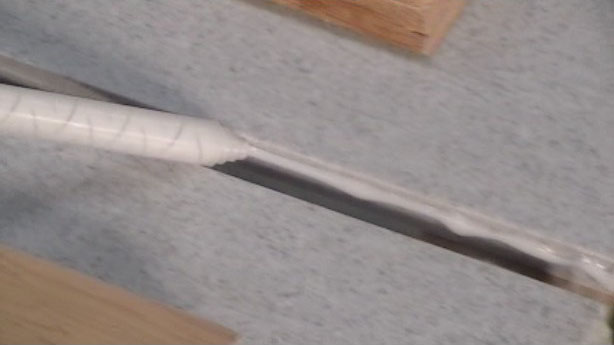
  • Apply the adhesive to the materials to be joined. Lay down the bead of adhesive by pulling the gun tip toward you. [See Photo 4]


    Photo 4: Apply a 1/4″ bead of adhesive.

  • Infrequently, an air bubble that is trapped in the catalyst part of the adhesive is released into the mixing tube and the air (instead of catalyst) mixes in with the base component. As a result, this portion of the bead will lack the catalyst and will not cure or set. To prevent this from happening, add a second bead of adhesive to ensure that catalyst is available to all areas of the adhesive bead. It’s unlikely that air bubbles will occur at exactly the same point twice.   (TIP: storing the cartridge in an upright position allows air bubbles to rise to the top and be expelled during the initial dispensing of material from the cartridge that is mentioned above)
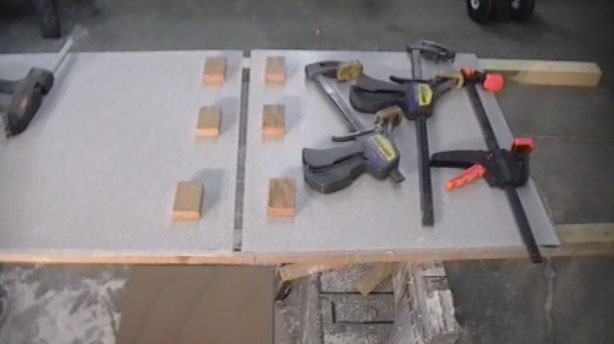
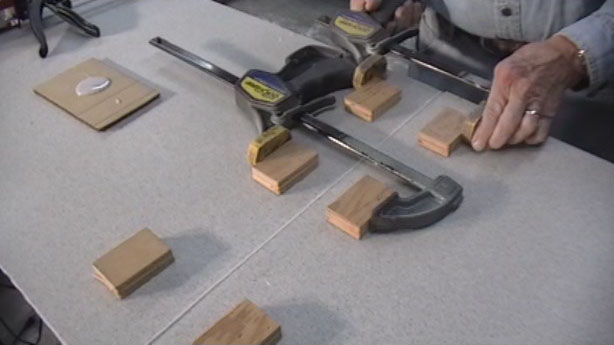
  • Clamp the pieces together, let the adhesive set, and move on to the next steps for completing your project. [See Photo 5]


    Photo 5: Clamp the pieces together.

As you can see, the new adhesive guns have been optimized to make your solid surface projects easier and more effective. Here’s wishing you every success(!) and be sure to also visit our instructional guides for working with solid surface for more in-depth instruction.


4 Tips to Sanding Corian®: Guidelines for a Perfect Finish

5" Sanding Kit at SolidSurface.com

5″ Sanding Kit by SolidSurface.com

Sanding is often considered one of the most dreaded parts of most DIY or professional projects. However, perhaps a little shift in perspective is called for here. Instead, imagine this… immediately being able to take something from a lifeless finish to a matte or gloss finish, creating a thing of beauty right before your eyes, in a matter of steps!

The Correct Finish for Corian®* is the One You or Your Client or Customer Prefer

Although you should always go with the finish that either you or your client or customer desires, here are some good rules of thumb to choosing an effective finish:  High use areas call for light colors and a matte finish, as this combination is the least likely to show wear and tear. On the contrary, dark colors with a high gloss finish show wear and tear more readily and are best placed in lower use areas. Whatever finish is chosen, no additional sealers or coatings of any kind are required.

Use Random Orbit Sanding

Using a random orbit sander can provide you with an almost undetectable “scratch pattern.” The random orbit-sanding pad oscillates in a 3/32” circle while rotating at a variable rate, in a circle the width of the sander. The resulting sanding pattern is described as being a “random orbit scratch pattern” that is very difficult to detect compared to scratches left when sanding in a straight line or a circle.

To achieve an even sanding pattern over a large area, move the sander itself, front-to-back, over an area of about 2’ x 2’ and then cover the same area side to side. Repeat this pattern over the area two or three times. Wipe the area thoroughly with water to remove the sanding grit and dust and repeat the process with the next finer grit. Each new pass of the sander (front to back or side-to-side) should overlap the previous pass by 1/3 the diameter of the sanded path.

TIP: we recommend using a 5” or 6” diameter random orbit sander with a hook and loop disc and the ability to collect its dust.

Corian® is the Same Color Throughout, So—Sand Away

Many of the color options for Corian®, as well as other brands of solid surface, arrive from the factory with a matte finish, so sanding with a 280-grit disc will produce a similar matte finish. Before you change to the next finer grit make sure that the sanding scratches from the previous grit are completely removed and you’ll have less work to do. See the section below for how to achieve higher gloss levels.

If necessary, deep cuts or scratches can be removed using 120-grit, followed by 180-grit. When you are sanding out a deep scratch or cut, be aware that you may leave a noticeable indentation if you only sand the immediate area of the cut. Instead, feather sand the area away from the cut. Start by using 120-grit paper to sand away the cut in a tight circular pattern and then increase the sanding radius out to about 12”, spending more time toward the center. Next, sand the entire area with 180-grit paper, feathering out another 8” or more. Remember the color goes all the way through.

TIP: the larger the sanding grit number, the smaller the grit. The reverse is true if you are talking about grit size in microns. Also, positioning a light beyond the area you are sanding will help you see the sanding pattern.

Level of Gloss

In a situation where the countertop surface is completely covered by sanding scratches, the less depth that the scratches have, the higher level of gloss. Or stated differently, if light rays bounce off a surface without being deflected by sanding scratches, then you would see a mirror like reflection. As scratches on the surface become deeper, the light is deflected at greater angles. The resulting images become less distinct and less polished or mirror-like. Ultimately this results in a semi-gloss or blurred image, to even a matte finish where no image is reflected.  For a more in-depth article on finishes, see How to Clean and Refinish Corian® and Other Brands of Solid Surface Countertops.

Using non-woven pads (available in our sanding kits) with a random orbit sander adds an interesting touch to the desired finish that is hard to describe. Sand the surface one final time with 280-grit paper if a matte finish is desired. Making another pass with a maroon colored 320-grit non-woven pad, will give the surface an additional touch of “richness” that is different than if you had used a sanding disc with 320-grit.

The Sanding Sequence

Use 120-grit and 180-grit discs to remove heavy scratches and return the surface a flat finish, similar to the flat finish provided by some sheet manufacturers.

    • Matte finish: Use 280-grit and then the maroon non-woven pad.

    • Satin finish: Use 280-grit, 400-grit, and gray non-woven pad

    • Gloss finish: The degree of gloss appearance desired will depend in part on the material color and particulate composition. Use 280-grit, 400-grit, 600-grit and the gold non-woven pad for a moderate gloss. Then for a higher gloss use the 1000-grit in place of the gold pad and the 2000-grit polishing compound with the white non-abrasive non-woven pad. For the gloss-purest you can buff the surface with an automotive polisher and foam polishing pad glaze. This will yield the ultimate shine!

  • Surface Maintenance: Surface maintenance procedures are dependent on the type of damage and the degree of shine on the finish. Sand out cuts and scratches with 120-grit, 180-grit, and then 280-grit, which will approximate the matte finish of the original piece. Then use the procedures above to match the final finish.

Tip: if a small surface area with a matte finish needs touch-up, experiment with a damp sponge and cleansing powder like Comet®. If there is more sheen than a matte finish then use a cleansing powder and a maroon, grey, or gold non-woven pad.

Grit to Micron Conversion: 120-grit (125 micron), 180-grit (82 micron), 280-grit (52 micron), 400-grit (35 micron), 600-grit (26 micron), 1000-grit (18 micron).

*Corian® (by DuPont™) was invented in 1964 and has become the term used by many to refer to solid surface materials. Since then, several brands have been developed that are all similar in how they look, wear, and are fabricated. Other manufacturers and brands include:  LG Hausys HI-MACS®, LOTTE Staron®, Wilsonart® Solid Surface, Formica® Solid Surface, Hyundai L&C Hanex, Aristech® Avonite Surfaces®, Aristech® STUDIO Collection, Meganite®, and Mystera®, to name a few.

Information in this communication is provided as possible ways among many to accomplish the goals expressed and there are no warranties implied. SurfaceNet LLC dba SolidSurface.com is not liable or responsible for any actions taken.


Corian® vs. Granite? The Top 9 Things to Consider

Corian vs Granite

Return on Investment

Granite is currently a popular countertop material. As such, you will receive a higher price on the sale of your home in the current market if you have high quality granite kitchen countertops. If you’re not planning to sell anytime soon, then a return on investment may not be as important as cost and durability or how it enhances and enlivens your life.

The Winner—Granite, as long as it remains “popular” in the current market.

Cost

Live it up for less! You can purchase extremely attractive, lower cost countertops made with either Corian®* or Granite. Alternatively, you can also spend a small fortune on either to get the latest color and pattern. If you really want that to go all out and cost is not a concern, you can even create an extra special top out of a piece of Granite that contains rare fossils.

When if comes down to general cost comparisons, installed prices (per square foot) for Corian® vary from $30 to $130 and $35 to $225 for Granite.

The Winner—Corian®

Hygiene: Do you prepare food in your kitchen?

In commercial kitchens, any material that comes in contact with food must be NSF/ANSI 51 (National Sanitation Foundation – Food Equipment Materials) certified. Corian® is NSF/ANSI 51 certified since it is non-porous and has non-porous seams (that are invisible.) As a result, Corian® surface does not support the growth of bacteria. On the other hand, Granite does not meet this NSF/ANSI 51 standard, as it is porous and seams within the top can trap bacteria.

The Winner –Corian®

Aesthetically Pleasing

Granite has hundreds of color and pattern options due to its nature-driven pallet. The available selection is so expansive that it’s highly likely there’s an aesthetically pleasing option perfect for you.

Corian® also has over a hundred manmade colors and patterns, some of which mimic nature. Unlike granite however, a range of solid colors are also available. In fact, if you want a solid color to match something precisely, you can send a color sample to DuPont™ and they will custom make sheets for you in that exact color.

The Winner—Both! Go with Granite if colors and patterns designed by nature are your thing. Alternatively, go with Corian® if colors beyond nature excite you. An added Corian® bonus is that it can be custom made to match any color.

Upkeep

Granite needs to be sealed yearly, at a minimum. Corian®, however, never needs sealer or any liquid finish.

When it comes to cleaning, with Granite there is always that nagging concern that if a spill is not cleaned immediately, it will seep through the sealer and into the pores of the material. With Corian®, virtually any stain—including black permanent marker—can be wiped away (even the next day) with Comet® and a wet sponge.

The Winner—Corian®

Restorability and Durability

When it comes to heat resistance, you can’t place a hot pan from the range/stove on Corian®. Conversely, a pan from the range/stove can safely be placed on Granite. Neither Corian® nor Granite can withstand placing a hot pan out of the oven on it. These extreme heat situations can leave a scorched spot on the surface of the Corian® or in the sealer on the granite.

The good news is, if you accidentally scorch your Corian® top, you can always sand away the spot. Unfortunately, this is not the case with Granite, as the scorched sealant can permanently seep into its porous surface. So, be safe and use a trivet!

It’s never advisable to use your Corian® or Granite countertop as a cutting board. Always use a separate cutting board whenever possible. If you do end up scratching the surface of your Corian® countertop, the cuts can be removed by sanding them down. The appearance of cut marks in Granite can be made less visible by adding more sealant, epoxy scratch repair, or using a permanent marking pen.  

The Winner—Corian®

Ease of Fabrication/Installation

If you are experienced at working with wood, you can build your countertop—including sinks, faucets and 1-1/2” thick contoured edges—using Corian® and your woodworking tools. Working with Corian® is basically like working with hardwood.

If you’re adept at stone cutting, you can use diamond-edged tools to create your countertop. Start by purchasing one or more pre-cut, fixed-length blank Granite tops with finished edges. Then, use your diamond-edged tools to cut the holes for the sink and faucets. Another alternative is to fashion the top out of Granite tiles.

The Winner—Both, if you are handy!

Design and Artistic Potential

Granite is extremely flat and rigid material. Therefore, creating tops with flowing curves is not an option. Corian®, on the other hand, can be shaped into virtually any configuration by heating and forming it into the desired shape. This process is called thermoforming.

Another process, called dye sublimation, allows you to embed text and images into the surface of Corian®. This process heats the Corian® to open the pores along with a vacuum that deposits the dye into the surface. When it cools, it is no longer porous and the dye is permanently fixed just below the surface.

The Winner—Corian®  

Natural vs. Manmade vs. Renewable

There is no question about it—Granite is “natural” and it will last a long time. This is especially the case if the sealant successfully prevents the passage of grease, red wine or any other stain-inducing substance through to the Granite surface below. If stains do get deposited into the pores of the Granite, there is little that can be done except to replace the countertop.

Corian® is manmade, and when in need of a facelift, it can be resurfaced in your kitchen to the same “like new” condition as the day it was installed. To accomplish this, use the same sanding steps that were utilized when it was installed. Since the color and pattern are continuous throughout the material, you can give your Corian® countertop a sanding facelift every 10 to 15 years, as needed.

Winner—Both. Choose Granite if “natural” is your preference and Corian® if “renewable” is your preference.

Total “Wins”: Corian® = 4, Granite = 1, Both = 3.

 * DuPont™ Corian® is one of several brands of solid surface, all of which share similar characteristics and are typically used interchangeably. Other major brands include LG™ HI-MACS®, Samsung™ Staron®, Wilsonart™ Solid Surface (formerly Gibraltar®), Formica™ Solid Surface, Hanwha™  Hanex®, Aristech Acrylics™  Avonite®, Meganite™, and Mystera™, to name a few.