Category Archives: Solid Surface Showcase

The New Mystera: The Unique and Popular Solid Surface Returns in 100% Acrylic

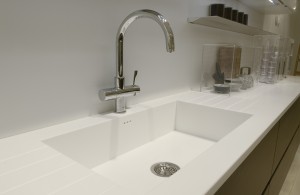
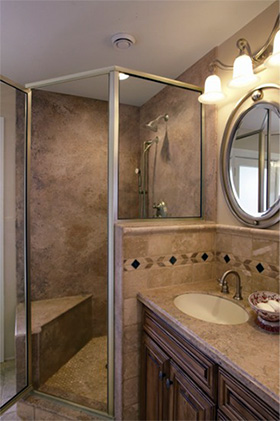
Mystera BathroomMystera was the first solid surface product, developed in mid-1990’s, to successfully emulate the look of natural quarried stone with the use of multi-colored, multi-directional, swirls and veining, in addition to traditional inclusion of large and small particulates. This set in motion a new look for the solid surface industry, with many brands following their lead.

Today, Mystera is back and better than ever!

With the re-introduction of Mystera you’ll benefit from higher performance standards and new contemporary styles, at very competitive prices.

Continue reading

Guide to Finding Corian® Glacier White and Other Solid White Solid Surface Material

Did you know that White is the most sought after color of the many hundreds of colors and patterns of solid surface? White is not only classic and aesthetically bright, it also provides a wonderful visual representation of solid surface’s naturally antiseptic nature.

While DuPont’s Corian® Glacier White is one of the more widely known and highly popular versions of white, there are also many other equally desirable white solid surface options available that may satisfy the needs of your project.  We thought it may be useful to put together this handy guide that presents the various white options available through SolidSurface.com:

DuPont Corian® Glacier White

Although Glacier White is not part of the standard stocked product offering at SolidSurface.com, it does frequently come into the overstock “full” and “partial sheet” inventory.  When items do become available, they frequently sell out fast. We suggest if you are interested in an item you either immediately grab it, or contact us to place a hold on it for you.

View the overstock Corian® Glacier White selection at SolidSurface.com

Select Grade Glacier White

The next best alternative to DuPont Corian® Glacier White is the Select Grade. Select Grade Glacier White is 100% acrylic solid surface made in the USA and matches the color of Corian® Glacier White. Select Grade is material that did not meet the manufacturer’s precise specifications and is made available under our overstock full and partial sheet inventory.  However, the majority of these ‘imperfections’ cannot be detected to an untrained eye, if even then. (Learn more about Select Grade.)

The primary benefits of Select Grade are that it is still a very high quality material offered at a considerably less expensive price.  Even more dramatic discounts are available when you purchase the material in 8-pack quantities or more, when available.  Both ½” & ¼” thick material are frequently listed in the overstock inventory.

View the Select Grade Glacier White selection at SolidSurface.com

Solid White Available From All Brands

Just about every brand of solid surface offers some type of solid white color.  There are many shades of solid white to choose from in a variety of different names, including Glacier White, Arctic White, Antique White, Alpine White, Bone or Ivory White and many more.  If you have a specific shade of white in mind for your project, its a good idea to locate physical samples for the options available.

SolidSurface.com offers an array of solid whites in both stocked full sheets and overstock full and partial sheets from many different brands including LG HI-MACS, Samsung Staron, Formica Solid Surface, Hanex and many more.  The best way to view what is available in both stocked and overstocked inventory is to visit the link below which displays a page that pre-filters the search options by “White” color family, “Solid” pattern, “Full Sheet” size and sorts by “Color Hue”.  All items listed are considered stocked (in-production and consistently available), unless the name contains “overstock” (limited availability).

Visit all of the solid white full sheets available at SolidSurface.com

For additional guidance on how to find material on SolidSurface.com, visit How to Find Solid Surface Material on SolidSurface.com


Make Holiday Magic: A Corian® or Solid Surface Cutting Board to DIY For!

Finding cool, unique gifts can be tricky. At this point, you might be feeling the crunch! Not only do you want to find a gift that your loved one or special someone will like—the greater challenge lies in finding something that will stand the test of “that’s a GREAT gift!” time.

Well, we have an easy solution that will set you out as the gift-giving guru this season. Creating a Corian® (or other solid surface material) cutting board is a personal, thoughtful and unique way to bring a smile to your loved one’s face.

Who Doesn’t Like A Custom Gift

The first step is to decide on a design for the cutting board or trivet. Consider creating a custom design that reflects a favorite shape or hobby of your gift recipient. You can also create a design that reflects a popular or regional shape (like a specific tree leaf, animal or activity) or one that will remind them of the season itself (like a snowman or Christmas tree ornament.)

Whatever your design, one thing is for certain, using any solid surface material like Corian® will ensure you are creating a quality cutting board that is not only beautiful, but also durable. All solid surface material is non-porous, so your gift recipient will never have to wonder about bacteria getting trapped on the surface. Solid surface material also provides a more resilient surface for cutting on than plastic or wood, which can often sustain deep, permanent cuts. To the contrary, scratches and cuts can be easily sanded out of its surface. Plus, your lucky gift recipient will also soon realize numerous other benefits to owning a solid surface cutting board or trivet, such as being dishwasher safe and heat and stain resistant.

Let’s Get Started!

As you will see, creating a custom cutting board out of solid surface material is an easy way to give your loved one or that special someone a unique gift they are sure to cherish. Get started by following these few simple steps:

STEP 1: The first step is to create a template for the design. You can create a template in a couple of ways. One is to take a piece of cardboard and create a template of the desired shape and draw an outline of the shape onto the solid surface material. The second way is to create a more substantial template out of solid wood, particleboard or MDF (medium density fiberboard.) Sand the edges of the template to ensure there aren’t any bumps, as you will be using this edge to guide the ball bearing collar on the router. Attach this template to the piece of solid surface with dabs of hot melt glue or use this template to draw an outline of the shape onto the solid surface material.

STEP 2: If you have it, use a router with a ball bearing collar or guide and a carbide bit to rough cut out the desired shape from the solid surface (the collar will rest against the template and enable you to maneuver with more accuracy around the attached template.) The optimal method would be to cut the shape out with a jig saw within 1/8” of the template edge. This will allow you to then dress the shape out with the router bit.

Although it’s not the preferred method, if you don’t have a router you can also use a jig or scroll saw to cut out the entire shape—you will just have more sanding to do in order to smooth out the rough cut edges.

STEP 3: Determine what you want your finished edges to look like. If you are creating a cutting board or trivet with straight-line edges, you could add a rounded or beveled edge. If your design is more intricate (like an animal silhouette or shaped object) you will most likely want to just sand the edges smooth or slightly round them.

STEP 4: (Optional) Add a creative flourish to your cutting board or trivet by engraving a special message or adding a contrasting inlay. You can accomplish this by using a router with a 1/4” diameter bit to carefully scroll through the surface of the material (as if writing), making a groove. You can also clean out the groove and apply a different colored solid surface adhesive for contrast. For example, if the solid surface material you chose was white or cream, you could slightly overfill (to allow for shrinkage) the groove with a red or green adhesive. Once the filled adhesive has dried, rough sand the surface smooth with 180 grit sandpaper and a random orbit sander and move on to Step 5.

STEP 5: Put the finishing touch on your gift by sanding and polishing the cutting board or trivet surface to the desired finish. Start out by sanding the surface with 280-grit sandpaper, switching to a 400-grit to achieve a smooth semi-gloss finish. For a high-gloss finish, follow up with 600-grit and 1,000-grit sandpaper. Lastly, apply an automotive polish with a 200-grit polishing compound to put the final touches on your high gloss surface.

With a little bit of creativity and thought—while following the five steps we’ve laid out above—you’re bound to create a unique gift that will impress your loved one or special someone for years to come.

Happy Holidays from the entire SolidSurface.com family to yours!


How to Find Solid Surface Material on SolidSurface.com

Corian®, Mystera®, Staron®, Hi-MACS®, Formica® Solid Surface, Hanex®, Meganite®, House Premium®, Wilsonart®, Avonite® and Basix® sheets are among the many brands of sheets available on SolidSurface.com. We will focus on how to find these sheets (in various brands and colors) within our Stocked Material (“consistently available”) and Overstock Material (“inventory varies” options. View the video instruction below and/or continue reading to learn how to effectively find material.

Selecting Stocked vs. Overstock Materials

Stocked Material includes full product lines from leading manufacturers that are in-production and consistently available.   Here we offer material in standard full sheet sizes (30” x 144”) and thicknesses (¼” and ½”.)

Overstock Material consists of a huge selection of discounted full and partial sheets. Inventory levels can vary and are available on a first come first serve basis.  Overstock material may include in-production and discontinued colors that can be hard to find. They range in size from small pieces (5” x 30”) to full sheets (30” x 144”) and range in thickness from ¼” to ½”.

Locate Stocked Material

To find Stocked Material, mouse over Stocked Material on the navigation bar to reveal your available Stocked Material Options.  You can select from one of the brands listed, the additional options, or simply click on the Stocked Material button.  Let’s select the LG HI-MACS  brand for this demonstration.

Now we are on the “Product Listing” page where we can narrow down our shopping options for the brand we selected.   Options to filter by include: color familypatternthickness and price range (presented as a slider bar), to name a few.  Looking at the color options, you will see a number in parentheses beside it. This number represents the number of matching colors for that option. (For example, there are 4 blacks available in the  LG HI-MACS  brand.)  Each time an option is selected, or a slider bar is moved, it will refresh the page.

There are additional viewing options in the product listing to help your search.  You can sort by namepricecolor hue, and more.  You can also view the products as a list or as a grid, as well as change the number of results shown per page.

You can also click on the image thumbnails to reveal larger versions of the product images.  Click on the product name or the “more info” button to go to the product page.

The product page contains product detailssize options and additional product recommendations (such as matching adhesives, dispensing guns and abrasives.)  For convenience, you can also add the item to your shopping cart from here.

That wraps up the summary of how to find stocked material.

Locating Overstocked Material

Finding Overstock Material is a similar process, but there are important differences we want to point out.  Mouse over the Overstock Material on the navigation bar to reveal numerous options that might help narrow-down your initial search.  To view all overstock material available, click the “Overstock Material” button.

The Overstock Section has many of the same shopping (filtering) options as Stocked Material, along with a few more. These include: Full and Partial SheetsLength and WidthBrandPrice/SqftMinimum Qty Purchase, and Production Status.  You can mouse over the “?” to learn more about each filter option, but we’d like to focus your attention on a particularly useful one: the “Minimum Qty Purchase” option.

Some overstock material must be purchased in minimum quantities.  For convenience, we’ve put this information in the product listing as well as on the product detail pages.  As an example, some Select Grade material is only available as 8-packs, and often times those are the best deals. Therefore, you may want to use the filter to only show material with a minimum qty of “8 or more” to filter out the other material.

Alternatively, you may only need one sheet. In this case you would set the range on the filter from “1 to 1”, filtering out all larger minimum quantity requirements.

The overstock product list can be also be sorted. To enable this, we have provided some important sorting criteria including namequantity availablecolor huelengthwidththicknesssqftdate last updated, to name a few.

Now it’s time to set out on your search to find the perfect material for your project! Please don’t hesitate to contact us if you should need any assistance finding the material you are looking for.

How to Make Solid Surface (Corian®) Windowsills

Using Corian® or solid surface window sill treatment is a great way to create beautiful, long lasting, water-damage proof, windowsills for your windows. It’s time to let go of your fears of what will happen to your windowsill surface if you accidentally over water your plants, forget to close the window during a rainstorm, or if condensation builds up on the inside of your window and drips on the sill. Breathe easy—these mishaps have no effect on non-porous, solid surface windowsills!

Solid surface material has many attributes that contribute to making a windowsill a labor of love and ease. Here are six…

  1. No grain and is Non-porous.
  2. Cuts and sands like hard wood.
  3. Virtually “seamless” after gluing pieces together.
  4. Sunlight and UV resistant.
  5. No coating to peel or fade.
  6. Won’t rot, mold or mildew.

The Evidence Speaks for Itself

Solid Surface Window Sill

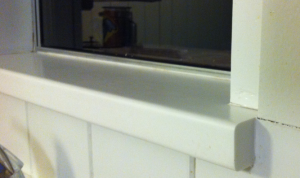
Picture 1. Solid Surface Window Sill.

Solid Surface Window Sill

Picture 2. Solid Surface Window Sill.

As you will see, solid surface windowsills speak for themselves. Pictures 1 and 2 below show a Corian® Glacier White window sill that has been in place 17 years and has always had plants sitting on it. This sill has withstood water rings and if a metal pot left a rust ring on the sill, Comet and a Scotch Brite pad removed it with a few scrubbing motions. Otherwise, maintenance consisted of simply wiping it clean with a damp cloth.

In the first picture you can see the three main components that make up the sill: 1) The overhang that extends down at the front of the sill; 2) the ends (ears or wings) of the sill that extend beyond the edge of the window casing; and 3) the flat surface between the overhang and the window that is commonly referred to as the deck.

Create Your Own Corian® or Solid Surface Windowsill

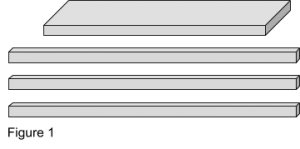
windowsill-figure-01 windowsill-figure-02To create this sill, glue together three strips of solid surface material to create the overhang and ear (or wing) portion of the sill. (Figure 1.)

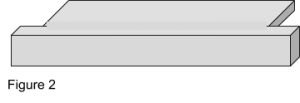
Next, glue the three-strip portion to the front edge of the deck piece that sits in the sill area. (Figure 2.) Notice, that even though there are three seams present, there is no evidence of their existence after the excess glue squeeze-out is sanded away. Building the overhang in this fashion is advantageous because it can be sized so the wings and overhang are exactly what you want, without having to trim them to size after they are glued to the deck piece.

It’s a lot easier to create and finish some aspects of the overhang prior to gluing it to the deck piece. For example, trimming the wings to fit around the window casing is not necessary if the pieces that make up the overhang are sized correctly before attaching them to the deck. On the other hand, routing a profile on the overhang is easier if it’s crafted after the overhang is attached to the deck. Remember to leave ⅛” on either end of the deck to allow for expansion.

Once the windowsill is completed and dry fitted to the windowsill area, it’s ready to be attached. The sill must be supported by an adequate substructure of either wood or masonry materials. Depending on what it’s being attached to, you may want to include an insulation layer like a thickness of wood or other insulating sheet under the deck of the sill. Attach the deck of the sill to the substructure with several daubs of 100% silicone sealer.  Apply a 100% silicone bead of caulk around the perimeter of the deck and overhang to stop water seepage and let it set overnight. Now you can enjoy your new trouble free windowsill for years to come!