Tag Archives: adhesive

SolidSurface.com Ranks on the 2017 Inc. 5000

Inc. Magazine Unveils 36th Annual List of

America’s Fastest-Growing Private Companies—the Inc. 5000

SolidSurface.com Ranks on the 2017 Inc. 5000

with Three-Year Sales Growth of 51.43%

TUCSON, AZ, October 1, 2017Inc. magazine ranked SolidSurface.com No. 4614 on its 36th annual Inc. 5000, the most prestigious ranking of the nation’s fastest-growing private companies. The list represents a unique look at the most successful companies within the American economy’s most dynamic segment— its independent small and mid-sized businesses. Companies such as Microsoft, Dell, Domino’s Pizza, Pandora, Timberland, LinkedIn, Yelp, Zillow, and many other well-known names gained their first national exposure as honorees of the Inc. 5000.

SolidSurface.com co-founder and CEO, Kyle Carpenter, had this to say:

“It’s quite an honor to be ranked among the top 5000 of America’s fastest growing companies, and then to see how previously ranked companies moved on to the top of their industries. Our expectation is to stay on track and hit the top of our industry.”

The 2017 Inc. 5000, unveiled online at Inc.com and with the top 500 companies featured in the September issue of Inc. (available on newsstands August 16), is the most competitive crop in the list’s history. The average company on the list achieved a mind-boggling Continue reading

Fabricator Spotlight: ASST – Fabricating Unique Destinations with Thermoformed Corian® Solid Surface

Featured Project: Terminal F, Philadelphia International Airport

By Andrew Dreves, ASID

Philadelphia International Airport, Terminal F

Philadelphia International Airport, Terminal F

With airport security and travel being about as much fun as a root canal, airport terminals today are striving to become unique destinations people want to visit.  With a reputation for creating visionary environments, Daroff Design, based in Philadelphia had an adventurous solid surface thermoforming project at Philadelphia Airport’s Terminal F and they knew who could help.

ASST had worked with Daroff Design previously on the Baltimore Convention Center and the design firm is well known internationally for high-end public and signature hospitality environments.

ASST (pronounced ASSIST), since its founding in 1998, has become an industry leader in commercial architectural fabrications establishing a reputation for taking on project challenges other solid surface fabricators might avoid.

Schultz Form

With a passion for excellence and an impressive portfolio of successfully completed projects both nationally and internationally, ASST’s in-depth portfolio ranges from curved Corian® benches for the White House Visitor’s Center in Washington DC to an enormous curved solid surface Krion® staircase for a corporate building atrium in Boston. Continue reading

SolidSurface.com Recognized as Top 300 E-Commerce Company

SolidSurface.com Top 300 B2B E-Commerce Site

SolidSurface.com Top 300 B2B E-Commerce Site

Tucson, AZSolidSurface.com–the online source where you can purchase virtually any brand, color or size of solid surface decorative surfacing material–has been named by Internet Retailer and B2BeCommerceWorld.com as one of the top300 B2B (Business to Business) e-commerce companies for 2017 for the second consecutive year. They have impressively been ranked 39th in the Hardware/Home Improvement Industry. Additionally significant, Internet Retailer magazine has also recognized SolidSurface.com as a Top 1000 general e-commerce website, not just B2B, for the past four years.

B2B E-Commerce companies in the Hardware/Home Improvement category are expected to grow by 28%, to more than $13 billion, up from $10 billion last year, mainly due to the continued strength of the housing Continue reading

Tips for Successfully Seaming Corian® & Other Solid Surface Brands

Integra Adhesives

Integra Adhesives

Have you ever spent hours correctly measuring, cutting and fitting pieces of Corian® or other solid surface material together, only to have your seams fail? If you have, then you know how frustrating this can be!

How do you avoid this? The key is to keep your solid surface adhesive live and performing throughout the fabrication process. Here are some highly effective strategies for storing and applying adhesive to ensure the best possible performance and seaming success:

Adhesive Care

  • Store adhesive upright in a cool dry place that is away from direct sunlight.
  • Store adhesive in an air-conditioned room or a refrigerator designed for the storage of flammable products to extend its shelf life. (NOTE: Do not store adhesive alongside food.)
  • Store upright to allow any trapped air bubbles to reach the top (outlet) of the cartridge and be eliminated during the initial purge. To purge, hold the cartridge at an upward angle, mixing tip NOT attached, and dispense approximately a tablespoon into a disposable container like a paper cup. Make sure you see adhesive dispensing from both sides of the cartridge.
  • Do not use the adhesive if it has been exposed for an extended period to high temperatures during transport or storage. In this situation, the activator (catalyst) may break down and lose strength.
  • High temperature decomposition of the activator can also release gasses into the activator component, which may impact the consistency of the cure, leaving uncured spots.

If stored correctly the adhesive can last for a year. However, the activator portion will slowly lose reactivity over time. If in doubt, run a test by dispensing a ¼” bead on cardboard and if a slow, uneven or incomplete cure results, discard the adhesive.

In addition to properly caring for your adhesive, following these eight performance guidelines will help ensure successful seaming during your fabrication process:

Performance

  • Allow both the adhesive and solid surface sheet material being joined to reach a room temperature of at least 60 degrees Fahrenheit (18 degrees Celsius) before assembling.  Bringing material into a warm humid room after being cold can cause moisture to condense on the surface, which can interfere with bonding.
  • Fabricating cold sheets in a warm room will cause the adhesive on the edge of the joint to cure faster than the adhesive deep in the joint. This is because cold solid surface materials absorb a significant portion of the energy from the chemical reaction, resulting in less than optimal curing conditions. This can ultimately cause a weakening of the seams in those areas. It is best practice to let the sheets reach room temperature.
  • Another reason to allow cold adhesive to return to room temperature before use is that some adhesive components become thicker at low temperatures. This creates higher pressure that may flex the cartridge wall and throw off the mix ratio.
  • If you re-warm adhesive, make sure the cartridge outlet plug is in place rather than the mixing tip. Adhesive left in the tip will warm faster and may expand back into the activator chamber where the two components will harden and result in a plugged cartridge.
  • Never expose adhesive to high heat. Warming adhesive above 110 degrees Fahrenheit can damage the activator component.
  • When gluing pieces together, run two small beads (one over the other) instead of a larger single bead. Overlapping adhesive streams will greatly reduce the possibility of under cured areas caused by air bubbles, from the activator side of the cartridge, mixing in with the base component in place of activator.
  • Use the full stroke of the trigger to maintain a smooth and constant feed pressure. Quickly re-trigger the gun and continue this technique until dispensing is complete. This application technique will help to prevent adhesive from seeping out of the tip between strokes. Using a dripless adhesive gun is also beneficial.
  • Apply as little pressure as possible to dispense the adhesive and maintain a constant forward motion of the cartridge pistons to minimize off-ratio dispensing. We recommend an 18:1 thrust ratio on the gun for smooth dispensing.

Here’s to Your Seaming Success!

Using a quality dispensing gun and quality adhesives, storing them correctly and following the simple procedures outlined above will result in a flawless seam most every time. If the viability of your adhesive is ever in doubt, simply run a ¼” diameter test bead on some scrap cardboard for a couple of feet and look for slow, uneven or incomplete cure results. Once you are certain you have live and performing adhesive, you’re fabrication process should go seamlessly!

Visit our Working With Solid Surface guide to learn more great fabrication techniques.

10 Qualities of a Great Solid Surface Adhesive Dispensing Gun

Solid surface adhesive dispensing guns have evolved to become an easy to use and essential part of fabricating solid surface. A few years ago the adhesive came in two separate containers. You then had to mix it together in a paper cup with a wooden stick, similar to a doctor’s tongue depressor.

After that you could spread the adhesive mixture onto the solid surface joint with a stick. It was a tedious, time consuming and messy process with plenty of opportunity for mixing ratio errors. If the correct amount of catalyst was added to the base component in the ratio of 10 base to one catalyst, and the temperature in the facility was right, then the adhesive would set (harden) in 20-30 minutes. In this case, the project could move along as planned.

If too much catalyst was added, then the set time would be shorter. However, the challenge in this case is that  you wouldn’t be aware of this until it started to set, making it too late to position the components. This would leave you with an excess of gelled adhesive that would have to be removed before the job could go forward.

If too little catalyst was added, the set time would be extended. In this instance you wouldn’t know it until the pieces were in place, forcing you to wait until the adhesive had set. This process could take hours, once again resulting in a project delay.

Adhesive guns have come a long way!

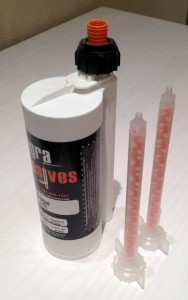
Today, almost every adhesive brand comes in a two cylinder cartridge. The larger cylinder holds 10 times more base component than the smaller cylinder that contains the catalyst. This is where the terminology 10:1 adhesive comes from. [See Photo 1]


Photo 1: Integra Adhesive 10:1 ratio adhesive cartridge and mixing tips.

This delivery design allows for the same ratio of adhesive to be dispensed, cartridge after cartridge. When you pull the adhesive gun trigger, the adhesive in the cartridge is applied directly to the solid surfaces to be joined. This results in a lower risk of project delays due to improper component ratios.

The Top 10 Qualities of New Solid Surface Adhesive Dispensing Guns

Now, let’s consider the top evolutionary qualities of the new solid surface adhesive guns and how they can positively impact the success of your project:

  1. Possesses a “dripless” feature so when you release the trigger (in order to squeeze the trigger again) the adhesive doesn’t run out.
  2. Fits 250ml adhesive cartridges from Integra, Sta-Put (Plexus), HI-MACS, Avonite®, Formica®, and Wilsonart® (Gibraltar) and others.
  3. Has a comfortable padded grip to help prevent hand fatigue.
  4. Possesses an 18:1 thrust ratio so you can use a moderate controlled hand pressure to make sure the adhesive flows evenly from the tip.
  5. Has twin precision gripping plates that carefully control the advancement of the pistons.
  6. Contains a “wear adjustment” screw to keep the gripping plates configured properly.
  7. Capable of dispensing high-viscosity solid surface adhesive.
  8. Has a thumb-activated rear lever to instantly stop dispensing when completed.
  9. Contains extra durable, heat-treated piston push-rods that resist wear and misuse.
  10. The durable cartridge cage is made of steel for long life.

How do these top 10 qualities fit into the task of seaming solid surface?

Lets take a look at the actual steps that promote a good bond and successful project:

  • First, cut and position the solid surface components so they are ready for the application of adhesive. (It also helps if the material is allowed to reach the temperature of 60 degrees or warmer.) [See Photo 2]


    Photo 2: Prepare the material and tooling.

  • Place the cartridge in the gun and pull the trigger to position the gun pistons correctly behind the cartridge.
  • Open the cartridge, and hold the gun at an upward slant with a paper cup under the cartridge openings. Pull the trigger so a small amount of materials are dispensed from both cylinders of the cartridge. (Make sure you see material flowing from both cylinders.)
  • Place the mixing tip in place and tighten the retaining nut to hold it there.
  • Pull the trigger so that adhesive flows through the mixing tip and onto a scrap piece of cardboard or into the cup. Dispense a blob about the size of a quarter to make sure it is flowing properly. [See Photo 3]


    Photo 3: Purge a small amount of adhesive to ensure a good mix.

  • Apply the adhesive to the materials to be joined. Lay down the bead of adhesive by pulling the gun tip toward you. [See Photo 4]


    Photo 4: Apply a 1/4″ bead of adhesive.

  • Infrequently, an air bubble that is trapped in the catalyst part of the adhesive is released into the mixing tube and the air (instead of catalyst) mixes in with the base component. As a result, this portion of the bead will lack the catalyst and will not cure or set. To prevent this from happening, add a second bead of adhesive to ensure that catalyst is available to all areas of the adhesive bead. It’s unlikely that air bubbles will occur at exactly the same point twice.   (TIP: storing the cartridge in an upright position allows air bubbles to rise to the top and be expelled during the initial dispensing of material from the cartridge that is mentioned above)
  • Clamp the pieces together, let the adhesive set, and move on to the next steps for completing your project. [See Photo 5]


    Photo 5: Clamp the pieces together.

As you can see, the new adhesive guns have been optimized to make your solid surface projects easier and more effective. Here’s wishing you every success(!) and be sure to also visit our instructional guides for working with solid surface for more in-depth instruction.