Tag Archives: Corian

Make Holiday Magic: A Corian® or Solid Surface Cutting Board to DIY For!

Finding cool, unique gifts can be tricky. At this point, you might be feeling the crunch! Not only do you want to find a gift that your loved one or special someone will like—the greater challenge lies in finding something that will stand the test of “that’s a GREAT gift!” time.

Well, we have an easy solution that will set you out as the gift-giving guru this season. Creating a Corian® (or other solid surface material) cutting board is a personal, thoughtful and unique way to bring a smile to your loved one’s face.

Who Doesn’t Like A Custom Gift

The first step is to decide on a design for the cutting board or trivet. Consider creating a custom design that reflects a favorite shape or hobby of your gift recipient. You can also create a design that reflects a popular or regional shape (like a specific tree leaf, animal or activity) or one that will remind them of the season itself (like a snowman or Christmas tree ornament.)

Whatever your design, one thing is for certain, using any solid surface material like Corian® will ensure you are creating a quality cutting board that is not only beautiful, but also durable. All solid surface material is non-porous, so your gift recipient will never have to wonder about bacteria getting trapped on the surface. Solid surface material also provides a more resilient surface for cutting on than plastic or wood, which can often sustain deep, permanent cuts. To the contrary, scratches and cuts can be easily sanded out of its surface. Plus, your lucky gift recipient will also soon realize numerous other benefits to owning a solid surface cutting board or trivet, such as being dishwasher safe and heat and stain resistant.

Let’s Get Started!

As you will see, creating a custom cutting board out of solid surface material is an easy way to give your loved one or that special someone a unique gift they are sure to cherish. Get started by following these few simple steps:

STEP 1: The first step is to create a template for the design. You can create a template in a couple of ways. One is to take a piece of cardboard and create a template of the desired shape and draw an outline of the shape onto the solid surface material. The second way is to create a more substantial template out of solid wood, particleboard or MDF (medium density fiberboard.) Sand the edges of the template to ensure there aren’t any bumps, as you will be using this edge to guide the ball bearing collar on the router. Attach this template to the piece of solid surface with dabs of hot melt glue or use this template to draw an outline of the shape onto the solid surface material.

STEP 2: If you have it, use a router with a ball bearing collar or guide and a carbide bit to rough cut out the desired shape from the solid surface (the collar will rest against the template and enable you to maneuver with more accuracy around the attached template.) The optimal method would be to cut the shape out with a jig saw within 1/8” of the template edge. This will allow you to then dress the shape out with the router bit.

Although it’s not the preferred method, if you don’t have a router you can also use a jig or scroll saw to cut out the entire shape—you will just have more sanding to do in order to smooth out the rough cut edges.

STEP 3: Determine what you want your finished edges to look like. If you are creating a cutting board or trivet with straight-line edges, you could add a rounded or beveled edge. If your design is more intricate (like an animal silhouette or shaped object) you will most likely want to just sand the edges smooth or slightly round them.

STEP 4: (Optional) Add a creative flourish to your cutting board or trivet by engraving a special message or adding a contrasting inlay. You can accomplish this by using a router with a 1/4” diameter bit to carefully scroll through the surface of the material (as if writing), making a groove. You can also clean out the groove and apply a different colored solid surface adhesive for contrast. For example, if the solid surface material you chose was white or cream, you could slightly overfill (to allow for shrinkage) the groove with a red or green adhesive. Once the filled adhesive has dried, rough sand the surface smooth with 180 grit sandpaper and a random orbit sander and move on to Step 5.

STEP 5: Put the finishing touch on your gift by sanding and polishing the cutting board or trivet surface to the desired finish. Start out by sanding the surface with 280-grit sandpaper, switching to a 400-grit to achieve a smooth semi-gloss finish. For a high-gloss finish, follow up with 600-grit and 1,000-grit sandpaper. Lastly, apply an automotive polish with a 200-grit polishing compound to put the final touches on your high gloss surface.

With a little bit of creativity and thought—while following the five steps we’ve laid out above—you’re bound to create a unique gift that will impress your loved one or special someone for years to come.

Happy Holidays from the entire SolidSurface.com family to yours!


How to Make Solid Surface (Corian®) Windowsills

Using Corian® or solid surface window sill treatment is a great way to create beautiful, long lasting, water-damage proof, windowsills for your windows. It’s time to let go of your fears of what will happen to your windowsill surface if you accidentally over water your plants, forget to close the window during a rainstorm, or if condensation builds up on the inside of your window and drips on the sill. Breathe easy—these mishaps have no effect on non-porous, solid surface windowsills!

Solid surface material has many attributes that contribute to making a windowsill a labor of love and ease. Here are six…

  1. No grain and is Non-porous.
  2. Cuts and sands like hard wood.
  3. Virtually “seamless” after gluing pieces together.
  4. Sunlight and UV resistant.
  5. No coating to peel or fade.
  6. Won’t rot, mold or mildew.

The Evidence Speaks for Itself

Solid Surface Window Sill

Picture 1. Solid Surface Window Sill.

Solid Surface Window Sill

Picture 2. Solid Surface Window Sill.

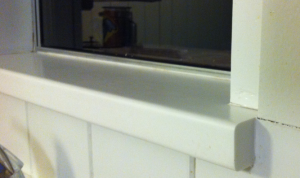
As you will see, solid surface windowsills speak for themselves. Pictures 1 and 2 below show a Corian® Glacier White window sill that has been in place 17 years and has always had plants sitting on it. This sill has withstood water rings and if a metal pot left a rust ring on the sill, Comet and a Scotch Brite pad removed it with a few scrubbing motions. Otherwise, maintenance consisted of simply wiping it clean with a damp cloth.

In the first picture you can see the three main components that make up the sill: 1) The overhang that extends down at the front of the sill; 2) the ends (ears or wings) of the sill that extend beyond the edge of the window casing; and 3) the flat surface between the overhang and the window that is commonly referred to as the deck.

Create Your Own Corian® or Solid Surface Windowsill

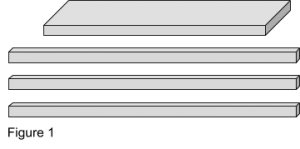
windowsill-figure-01 windowsill-figure-02To create this sill, glue together three strips of solid surface material to create the overhang and ear (or wing) portion of the sill. (Figure 1.)

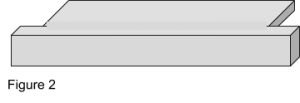
Next, glue the three-strip portion to the front edge of the deck piece that sits in the sill area. (Figure 2.) Notice, that even though there are three seams present, there is no evidence of their existence after the excess glue squeeze-out is sanded away. Building the overhang in this fashion is advantageous because it can be sized so the wings and overhang are exactly what you want, without having to trim them to size after they are glued to the deck piece.

It’s a lot easier to create and finish some aspects of the overhang prior to gluing it to the deck piece. For example, trimming the wings to fit around the window casing is not necessary if the pieces that make up the overhang are sized correctly before attaching them to the deck. On the other hand, routing a profile on the overhang is easier if it’s crafted after the overhang is attached to the deck. Remember to leave ⅛” on either end of the deck to allow for expansion.

Once the windowsill is completed and dry fitted to the windowsill area, it’s ready to be attached. The sill must be supported by an adequate substructure of either wood or masonry materials. Depending on what it’s being attached to, you may want to include an insulation layer like a thickness of wood or other insulating sheet under the deck of the sill. Attach the deck of the sill to the substructure with several daubs of 100% silicone sealer.  Apply a 100% silicone bead of caulk around the perimeter of the deck and overhang to stop water seepage and let it set overnight. Now you can enjoy your new trouble free windowsill for years to come!

Where to Buy Corian® and Other Brands of Solid Surface Sheet Material

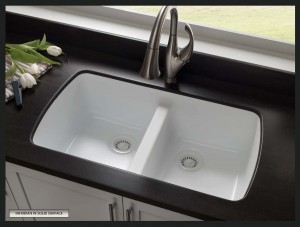
Karran Seamless Undermount Solid SurfaceIt’s one of the more common questions that drive visitors to SolidSurface.com and it’s one of the primary reasons we have become a leader in providing so many variations of solid surface products.

Sure, you can buy a finished bathroom, kitchen countertop, shower surround, or other Corian®-related project, from thousands of qualified professionals or even most of the big box stores.  But the question often arises, “Where can I get the raw sheet goods to either do my own projects, or purchase material inexpensively and have a professional build and install it for me?”  Or, if you’re a professional, you’ve probably been on a search for a place to get all your material in one-stop-shopping fashion and at discounted prices.

So Where DO You Buy Sheet Material?

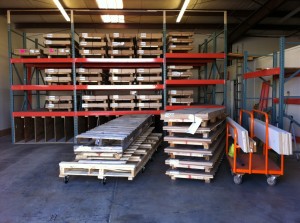
Solid Surface WarehouseQualified professionals often purchase material through certified distributors. Each distributor typically represents one or more manufacturer’s brands.  Teaming with a local distributor is a great way to go if that’s an option in your area.

Here at SolidSurface.com, we provide yet another layer of convenience. We uniquely offer multiple full product lines of sheet goods, as well as a wide variety of discontinued and overstock material in full and partial sheets, from leading manufacturers.  Our powerful search tools enable you to filter all material by brand, color, pattern, size, price, and more.  Additional product offerings include color-matched adhesives, abrasives, tooling and sinks.

As an added bonus, SolidSurface.com provides online educational resources such as our Solid Surface 101, Working with Solid Surface and Countertop Fundamentals series.  We also publish a blog with content-rich information including industry news, customer and fabricator profiles, how-to articles, company announcements and much more.

SolidSurface.com is also host to ProFinder, a resource for our customers and visitors—such as architects, designers, or homeowners—to locate local fabrication professionals across the country.  We are big proponents of the “Go Local” movement!

So, even if you don’t want to take on a project yourself (which is always a rewarding experience), we certainly encourage you to use SolidSurface.com to simplify and streamline your endeavor. Using our advanced search tools to locate the perfect material for your project and ProFinder to find a fabrication professional in your area will help bring your vision to life!

Tips for Successfully Seaming Corian® & Other Solid Surface Brands

Integra Adhesives

Integra Adhesives

Have you ever spent hours correctly measuring, cutting and fitting pieces of Corian® or other solid surface material together, only to have your seams fail? If you have, then you know how frustrating this can be!

How do you avoid this? The key is to keep your solid surface adhesive live and performing throughout the fabrication process. Here are some highly effective strategies for storing and applying adhesive to ensure the best possible performance and seaming success:

Adhesive Care

  • Store adhesive upright in a cool dry place that is away from direct sunlight.
  • Store adhesive in an air-conditioned room or a refrigerator designed for the storage of flammable products to extend its shelf life. (NOTE: Do not store adhesive alongside food.)
  • Store upright to allow any trapped air bubbles to reach the top (outlet) of the cartridge and be eliminated during the initial purge. To purge, hold the cartridge at an upward angle, mixing tip NOT attached, and dispense approximately a tablespoon into a disposable container like a paper cup. Make sure you see adhesive dispensing from both sides of the cartridge.
  • Do not use the adhesive if it has been exposed for an extended period to high temperatures during transport or storage. In this situation, the activator (catalyst) may break down and lose strength.
  • High temperature decomposition of the activator can also release gasses into the activator component, which may impact the consistency of the cure, leaving uncured spots.

If stored correctly the adhesive can last for a year. However, the activator portion will slowly lose reactivity over time. If in doubt, run a test by dispensing a ¼” bead on cardboard and if a slow, uneven or incomplete cure results, discard the adhesive.

In addition to properly caring for your adhesive, following these eight performance guidelines will help ensure successful seaming during your fabrication process:

Performance

  • Allow both the adhesive and solid surface sheet material being joined to reach a room temperature of at least 60 degrees Fahrenheit (18 degrees Celsius) before assembling.  Bringing material into a warm humid room after being cold can cause moisture to condense on the surface, which can interfere with bonding.
  • Fabricating cold sheets in a warm room will cause the adhesive on the edge of the joint to cure faster than the adhesive deep in the joint. This is because cold solid surface materials absorb a significant portion of the energy from the chemical reaction, resulting in less than optimal curing conditions. This can ultimately cause a weakening of the seams in those areas. It is best practice to let the sheets reach room temperature.
  • Another reason to allow cold adhesive to return to room temperature before use is that some adhesive components become thicker at low temperatures. This creates higher pressure that may flex the cartridge wall and throw off the mix ratio.
  • If you re-warm adhesive, make sure the cartridge outlet plug is in place rather than the mixing tip. Adhesive left in the tip will warm faster and may expand back into the activator chamber where the two components will harden and result in a plugged cartridge.
  • Never expose adhesive to high heat. Warming adhesive above 110 degrees Fahrenheit can damage the activator component.
  • When gluing pieces together, run two small beads (one over the other) instead of a larger single bead. Overlapping adhesive streams will greatly reduce the possibility of under cured areas caused by air bubbles, from the activator side of the cartridge, mixing in with the base component in place of activator.
  • Use the full stroke of the trigger to maintain a smooth and constant feed pressure. Quickly re-trigger the gun and continue this technique until dispensing is complete. This application technique will help to prevent adhesive from seeping out of the tip between strokes. Using a dripless adhesive gun is also beneficial.
  • Apply as little pressure as possible to dispense the adhesive and maintain a constant forward motion of the cartridge pistons to minimize off-ratio dispensing. We recommend an 18:1 thrust ratio on the gun for smooth dispensing.

Here’s to Your Seaming Success!

Using a quality dispensing gun and quality adhesives, storing them correctly and following the simple procedures outlined above will result in a flawless seam most every time. If the viability of your adhesive is ever in doubt, simply run a ¼” diameter test bead on some scrap cardboard for a couple of feet and look for slow, uneven or incomplete cure results. Once you are certain you have live and performing adhesive, you’re fabrication process should go seamlessly!

Visit our Working With Solid Surface guide to learn more great fabrication techniques.

With DuPont™ Corian® and Zodiaq®, David Bromstad Helps Homeowners Find Their Personality

Designer and TV personality David Bromstad is now the creative consultant for DuPont Corian® and Zodiaq®.

DuPont Building Innovations Reveals Design Personalities with David Bromstad to Encourage the Use of More Expressive Color in Home Design


WILMINGTON, Del., Oct. 3, 2013 /PRNewswire/ — Energetic and animated designer and TV personality David Bromstad is dropping his paint brush for a moment to infuse color in interior design through the use of beautiful and dynamic DuPont™ Corian® solid surfaces and DuPont™ Zodiaq® quartz surfaces.

Bromstad has worked with DuPont to design a fun quiz that will determine which one of seven distinct design personalities match a homeowner’s style to help in their quest to create personalized, inspiring kitchens and bathrooms using DuPont™ Corian® and Zodiaq® surfaces.

“Homeowners typically have one chance to design their kitchens and bathrooms, which are among the most used spaces in a home,” said David Bromstad. “Our design tools help to make it easier and more rewarding by introducing homeowners to their design personality and giving them a color palette to work with.”

After answering a few simple questions through a visual quiz, users are introduced to one of seven design personalities that best resonates with their style. Design personalities include:

  • The Collector: Every piece in her home tells a story. The Collector mixes textures from found objects with more classic styles for a palette based on rich browns and dark lichen. Light is brought in by sunshine yellow and soft greens.
  • The Socialite: The Socialite knows confidence is her best accessory. She’s self-assured at home and at work – always leading by example. Lighter grays and warm tones of sand are balanced by rich, jet black to create a feeling of luxury and longevity.
  • The Multi-tasker: The Multi-Tasker approaches life at full force – balancing and adjusting to the moment to meet it with exuberance. A family-friendly palette that is fresh, realistic, modern and classic – and infused with a much-needed jolt of coffee.
  • The Entertainer: With an eye for modern sophistication, the Entertainer is comfortable no matter where he is – which is usually at the center of any situation. Graphic red and black contrast for a high-end feel, but are softened with warm taupe and golden yellow for a truly sophisticated theme.
  • The Creator: The Creator loves anything quirky; what most people shy away from, he embraces. Mixed media, textures and inspirations make the color palette. From pairing water blues with coffee browns, this is experimentation at its bravest.
  • The Naturalist: The Naturalist feels most at home in the great outdoors and strives to bring a sense of well-being into her home. Soft buttery browns complement light beige and cream tones while speckle textures commonly found in stone and granite inspire solid surfaces.
  • The Traveler: The world is his inspiration. The Traveler mixes the best objects found in his travels – things that have an international significance to his life – to create a multi-cultural lifestyle. Anything exotic and unique is his normal; pottery clay, cobalt and indigo his color palette.


DuPont Building Innovations is a driving force in the transformation of the building and construction industry through its use of building and materials science to solve emerging needs and create value for its commercial and residential customers. The company maintains its industry-leading position by applying innovative thinking to the development of energy-saving weatherization systems and beautiful and long-lasting surfacing solutions. DuPont Building Innovations’ best-known products and premier brands include: DuPont™ Corian® solid surfaces, DuPont™ Zodiaq® quartz surfaces, DuPont™ Tyvek® Weatherization Systems and a broad portfolio of garden and landscaping products.

DuPont (NYSE: DD) has been bringing world-class science and engineering to the global marketplace in the form of innovative products, materials, and services since 1802. The company believes that by collaborating with customers, governments, NGOs, and thought leaders we can help find solutions to such global challenges as providing enough healthy food for people everywhere, decreasing dependence on fossil fuels, and protecting life and the environment. For additional information about DuPont and its commitment to inclusive innovation, please visit http://www.dupont.com.

Like Corian® on Facebook at Corian® Design and follow them on Twitter @coriandesign.

###
The DuPont Oval Logo, DuPont™, The miracles of science™, Tyvek®, Corian® and Zodiaq® are registered trademarks or trademarks of DuPont or its affiliates. Only DuPont makes Corian® and Zodiaq® surfaces.